
无界途旅项目
第一章:项目搭建
一、初始化项目
1. 使用脚手架创建项目
npm create vue@latest2. 删除项目无用文件
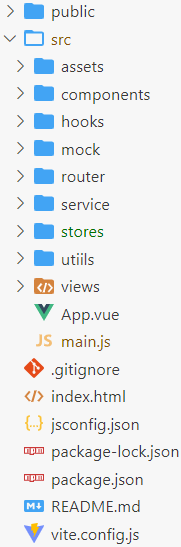
3. 搭建项目目录结构
4. 运行项目
二、CSS 样式
1. CSS 样式的重置
normalize.css
1)安装 normalize.css
npm install --save normalize.css2)在 @/main.js 中引入 normalize.css
import 'normalize.css'reset.css
在 @/assets/css 目录下添加 reset.css。
点我查看代码
/* http://meyerweb.com/eric/tools/css/reset/
   v2.0 | 20110126
   License: none (public domain)
*/

html, body, div, span, applet, object, iframe,
h1, h2, h3, h4, h5, h6, p, blockquote, pre,
a, abbr, acronym, address, big, cite, code,
del, dfn, em, img, ins, kbd, q, s, samp,
small, strike, strong, sub, sup, tt, var,
b, u, i, center,
dl, dt, dd, ol, ul, li,
fieldset, form, label, legend,
table, caption, tbody, tfoot, thead, tr, th, td,
article, aside, canvas, details, embed,
figure, figcaption, footer, header, hgroup,
menu, nav, output, ruby, section, summary,
time, mark, audio, video {
	margin: 0;
	padding: 0;
	border: 0;
	font-size: 100%;
	font: inherit;
	vertical-align: baseline;
}

a {
  text-decoration: none;
  color: inherit;
}

/* HTML5 display-role reset for older browsers */
article, aside, details, figcaption, figure,
footer, header, hgroup, menu, nav, section {
	display: block;
}
body {
	line-height: 1;
}
ol, ul {
	list-style: none;
}
blockquote, q {
	quotes: none;
}
blockquote:before, blockquote:after,
q:before, q:after {
	content: '';
	content: none;
}
table {
	border-collapse: collapse;
	border-spacing: 0;
}2. 组织 CSS
1)在 @/assets/css 目录下创建 common.css
2)在 @/assets/css 目录下创建 index.css
3)在 index.css 中引入其他 CSS 文件
@import 'reset.css';
@import 'common.css';4)在 @/main.js 中引入 index.css
import '@/assets/css/index.css'5)项目添加 less 依赖(后面用到)
npm install less -D三、路由配置
1. 安装路由
npm install vue-router@42. 配置:在 @/router/ 新建 index.js 文件,用于配置路由
import { createRouter, createWebHashHistory } from 'vue-router'

const routes = [
  { path: '/', redirect: '/home' },
  { path: '/home', component: () => import('@/views/home/home.vue') },
  { path: '/favor', component: () => import('@/views/favor/favor.vue') },
  { path: '/order', component: () => import('@/views/order/order.vue') },
  { path: '/message', component: () => import('@/views/message/message.vue') }
]

const router = createRouter({
  history: createWebHashHistory(),
  routes
})

export default router3. 集成:在 @/main.js 中引入 vue-router 插件
import router from '@/router'

// ......

createApp(App).use(router).mount('#app')4. 使用
1)编写每一个路由页面
以 Home 组件为例,其他一样。
<script>
  export default {

  }
</script>

<template>
  <div class="home">
    home
  </div>
</template>

<style lang="less" scoped>

</style>2)在 @/App.vue 中添加路由导航等
<router-view></router-view>
<router-link to="/home">首页</router-link>
<router-link to="/favor">收藏</router-link>
<router-link to="/order">订单</router-link>
<router-link to="/message">消息</router-link>
四、状态管理
1. 安装 pinia
npm install pinia2. 配置:在 @/stores 目录下新建 index.js
import {createPinia} from 'pinia'

const store = createPinia()

export default store3. 集成:在 @/main.js 中引入 pinia 插件
import pinia from '@/stores'

// ......

createApp(App).use(router).use(pinia).mount('#app')4. 使用
新建 @/stores/modules/city.js
import {defineStore} from 'pinia'

const useCityStore = defineStore("city",{
  state: () => ({
  }),
  actions: {
  }
})

export default useCityStore创建的 pinia 模块需要与第二步的
export default store关联吗?
不需要,因为 pinia 是自动(动态)导入模块的。
五、封装网络请求
1. 安装 axios
npm install axios2. 项目中对 axios 再次进行封装
@/service/request/config.js
export const BASE_URL = 'http://123.207.32.32:1888/api'
export const TIMEOUT = 5000@/service/request/index.js
点我查看代码
import axios from 'axios'

import { BASE_URL, TIMEOUT } from '@/service/request/config'

class DDFRequest{
  constructor(baseURL, timeout){
    this.instance = axios.create({
      baseURL: baseURL,
      timeout: timeout
    })

    this.instance.interceptors.request.use(config => {
      return config
    }, err => {
      return err
    })
    this.instance.interceptors.response.use(res => {
      return res
    }, err => {
      return err
    })
  }

  request(config){
    return new Promise((resolve,reject)=>{
      this.instance.request(config).then(res=>{
        resolve(res.data)
      }).catch(err=>{
        reject(err)
      })
    })
  }

  // 第二个参数可以不传,默认为空对象
  get(url, params = {}){
    return this.request({
      method: 'get',
      url: url,
      params
    })
  }

  // 第二个参数可以不传,默认为空对象
  post(url, data = {}){
    return this.request({
      method: 'post',
      url: url,
      data
    })
  }
}

export default new DDFRequest(BASE_URL, TIMEOUT)第二章:首页
一、TabBar 底部导航栏
1. 结构搭建
1)定义 tab-bar 组件
新建 @/components/tab-bar/tab-bar.vue
<script>
  export default {

  }
</script>

<template>
  <div class="tab-bar">
    tab-bar
  </div>
</template>

<style lang="less" scoped>

</style>2)App 组件里引入 tab-bar
@/App.vue
<script setup>
  // 1.引入
  import TabBar from '@/components/tab-bar/tab-bar.vue'
</script>

<template>
  <!-- 2.使用 -->
  <TabBar/>
</template>
3)编写 tab-bar 组件
点我查看代码
<script>
  export default {

  }
</script>

<template>
  <div class="tab-bar">
    <router-link to="/home">
      <img src="@/assets/img/tabbar/tab_home.png" alt="">
      <span>首页</span>
    </router-link>
    <router-link to="/favor">
      <img src="@/assets/img/tabbar/tab_favor.png" alt="">
      <span>收藏</span>
    </router-link>
    <router-link to="/order">
      <img src="@/assets/img/tabbar/tab_order.png" alt="">
      <span>订单</span>
    </router-link>
    <router-link to="/message">
      <img src="@/assets/img/tabbar/tab_message.png" alt="">
      <span>消息</span>
    </router-link>
  </div>
</template>

<style lang="less" scoped>
  .tab-bar {
    position: fixed;
    bottom: 0;
    left: 0;
    right: 0;
    height: 50px;
    display: flex;

    &>a {
      flex: 1;
      display: flex;
      flex-direction: column;
      justify-content: center;
      align-items: center;

      img {
        width: 34px;
        height: 34px;
      }
    }
  }
</style>
2. TabBar 动态数据
1. 新建 @/assets/data/tabbar.js
export default [
  {
    text: '首页',
    image: "tabbar/tab_home.png",
    imageActive: "tabbar/tab_home_active.png",
    path: '/home'
  },
  {
    text: '收藏',
    image: "tabbar/tab_favor.png",
    imageActive: "tabbar/tab_favor_active.png",
    path: '/favor'
  },
  {
    text: '订单',
    image: "tabbar/tab_order.png",
    imageActive: "tabbar/tab_order_active.png",
    path: '/order'
  },
  {
    text: '消息',
    image: "tabbar/tab_message.png",
    imageActive: "tabbar/tab_message_active.png",
    path: '/message'
  },
]2. 编写获取图片真实路径的函数
新建 @/utils/load_asserts.js
export const getAssertUrl = function (image) {
  return new URL(`../assets/img/${image}`, import.meta.url).href
}3. 引入数据与工具函数,使用 v-for 指令遍历
<script setup>
  import tabbarData from '@/assets/data/tabbar'
  import { getAssertUrl } from "@/utils/load_asserts"
</script>

<template>
  <div class="tab-bar">
    <template v-for="item in tabbarData">
      <router-link :to="item.path">
        <img :src="getAssertUrl(item.image)" alt="">
        <span>{{item.text}}</span>
      </router-link>
    </template>
  </div>
</template>3. 选中高亮
思路
1. 定义一个变量,记录当前选中的 tab。当发生点击时,改变该变量。
2. 编写一个 active 类。
3. 使用 :class 的对象写法,判断当前 index 是否等于该 tab 的 index。
<script setup>
  import { ref } from 'vue'
  // ......

  let currentIndex = ref(0)
</script>

<template>
  <div class="tab-bar">
    <template v-for="(item, index) in tabbarData">
      <router-link
       :to="item.path"
       :class="{'active': currentIndex === index}"
        @click="currentIndex = index"
      >
        <img v-if="currentIndex === index" :src="getAssertUrl(item.imageActive)" alt="">
        <img v-else :src="getAssertUrl(item.image)" alt="">
        <span>{{item.text}}</span>
      </router-link>
    </template>
  </div>
</template>4. 使用 Vant 库
1)引入 Vant
Vant 是一个轻量、可定制的移动端 Vue 组件库。
官方文档:Vant 文档
1. 安装
npm i vant2. 按需引入组件样式
# 安装插件
npm i @vant/auto-import-resolver unplugin-vue-components unplugin-auto-import -Dunplugin-vue-components:解析模板并自动注册对应的组件。
unplugin-auto-import:自动导入对应的 Vant API 以及样式。
auto-import-resolver:自动引入对应的组件样式。
3. 基于 Vite 的项目,在 vite.config.js 文件中配置插件:
// 配置插件
import AutoImport from 'unplugin-auto-import/vite';
import Components from 'unplugin-vue-components/vite';
import { VantResolver } from '@vant/auto-import-resolver';

export default {
  plugins: [
    vue(),
    AutoImport({
      resolvers: [VantResolver()],
    }),
    Components({
      resolvers: [VantResolver()],
    }),
  ],
};完成以上三步,就可以直接在模板中使用 Vant 组件了。
2)TabBar 改写
查看官方文档:Tabbar 标签栏 -- 导航组件
<template>
  <div class="tab-bar">
    <van-tabbar v-model="currentIndex" active-color="#ff9645">
      <van-tabbar-item v-for="(item, index) in tabbarData" :to="item.path" >
        {{ item.text }}
        <template #icon>
          <img v-if="currentIndex === index" :src="getAssertUrl(item.imageActive)" alt="">
          <img v-else :src="getAssertUrl(item.image)" alt="">
        </template>
      </van-tabbar-item>
    </van-tabbar>
  </div>
</template>还需要把之前自己写的无用 CSS 样式删除。
修改 UI 组件库的样式方法
1. 官方提供了使用插槽方法来定制。
2. 变量全局或局部定义,覆盖原有值。
3. f12 查看要修改样式元素的选择器,使用 Vue 提供的
:deep(select) {}
:deep(select) {}什么鬼
:deep(selector)是一个 CSS 预处理器的深度作用选择器,它可以用来样式穿透。当在一个组件中使用<style scoped>时,它的 CSS 只会应用到当前组件,不会影响到子组件。但有时候,需要改变子组件的样式。这时,就可以使用:deep(selector)。例如,有一个 .parent 组件,它有一个 .child 组件。想改变 .child 组件的样式,可以这样写:
css<style lang="less" scoped> .parent :deep(.child) { color: red; } </style>这将会使得 .parent 组件中的 .child 组件的文字颜色变为红色。
注意,:deep() 是一个伪类,它需要配合CSS预处理器(如 Less、Sass)使用。如果没有使用 CSS 预处理器,可以使用
>>>来代替 :deep(),如:css<style scoped> .parent >>> .child { color: red; } </style>
二、NavBar
@/views/home/cpns/home-nav-bar.vue
<script setup>
</script>

<template>
  <div class="nav-bar">
    <div class="title">
      无界途旅
    </div>
  </div>
</template>

<style lang="less" scoped>
 .nav-bar {
  display: flex;
  justify-content: center;
  align-items: center;
  height: 46px;
  border-bottom: 1px solid #f1f1f1;

  .title {
    font-size: 16px;
    font-weight: 600;
    color: var(--primary-color);
  }
 }
</style>三、SearchBox
1. 当前所在城市
参见第三章中的第六节。
2. 入住时间选择
查看官方文档:Calendar 日历 -- 表单组件
<van-calendar
  color="#ff9854"
  type="range"
  :show-confirm="false" <!-- 是否展示确认按钮 -->
  v-model:show="showCalendar"
  @confirm="onConfirm"
/>

let showCalendar = ref(false)
let onConfirm = values => {
  // 1.设置日期
  /* const selectStartDate = values[0]
  const selectEndDate = values[1] */
  const [selectStartDate, selectEndDate] = values;
  mainStore.startDate = selectStartDate
  mainStore.endDate = selectEndDate
  // 2.计算天数
  stayCount.value = getDiffDays(selectStartDate, selectEndDate)
  // 3.关闭日历
  showCalendar.value = false
}3. 热门民宿
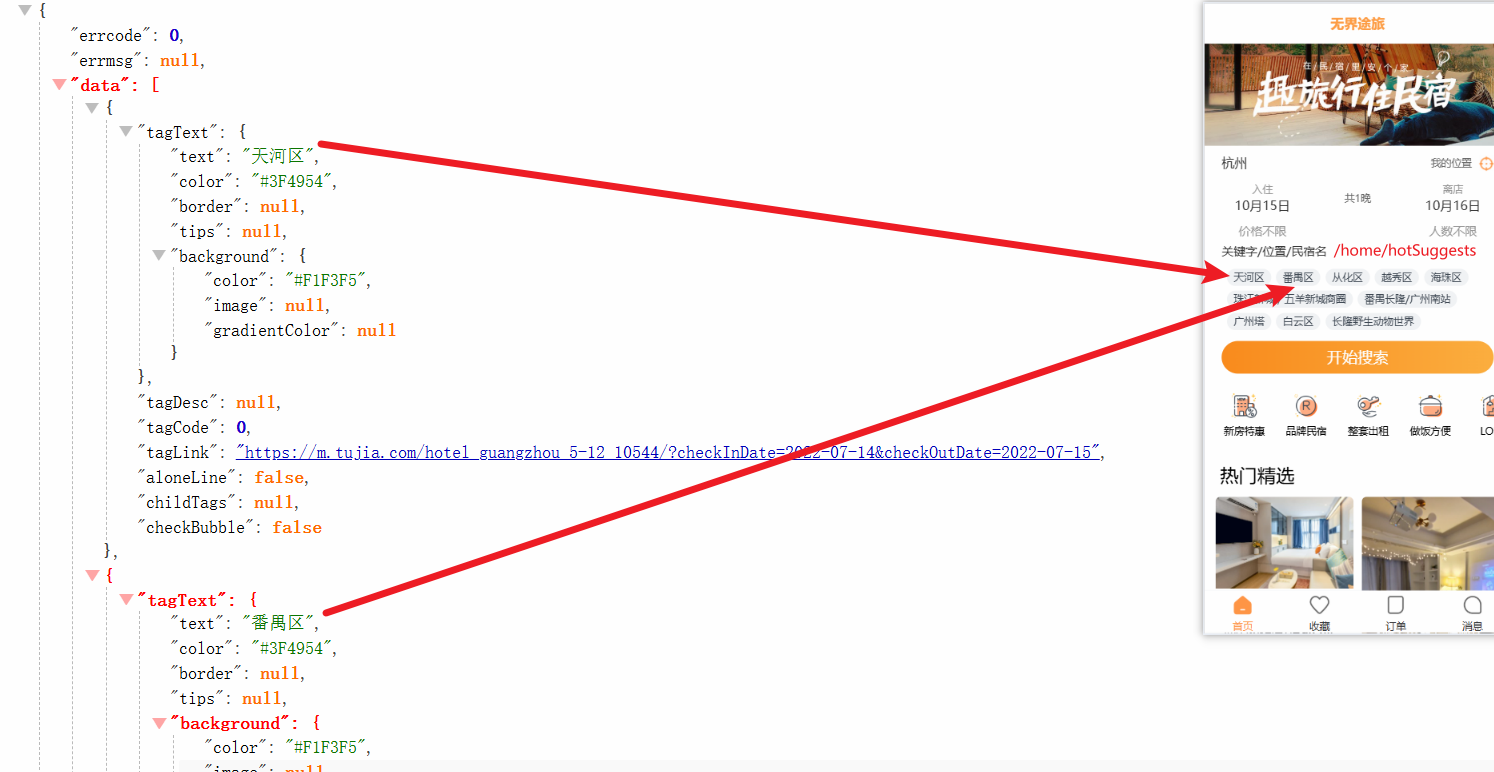
1)封装 API
@/service/modules/home.js
export function getHotSuggests () {
  return DDFRequest.get('/home/hotSuggests')
}2)请求网络的数据封装到 actions
@/stores/modules/home.js
import { defineStore } from 'pinia'

import { getHotSuggests } from '@/service'

export default defineStore('home', {
  state: () => ({
    hotSuggests: []
  }),
  actions: {
    fetchHotSuggests () {
      getHotSuggests().then(res => {
        this.hotSuggests = res.data
      })
    }
  }
})3)Home 组件中请求数据,存到 pinia 中
@/views/home/home.vue
import useHomeStore from '@/stores/modules/home'
let homeStore = useHomeStore()
homeStore.fetchHotSuggests()4)@/views/home/cpns/home-search-box.vue 中展示数据
import useHomeStore from '@/stores/modules/home'
// 热门民宿关键字
let homeStore = useHomeStore()
let { hotSuggests } = storeToRefs(homeStore)

<div class="item keyword">关键字/位置/民宿名</div>
<div class="item hot-suggest">
  <template v-for="(item, index) in hotSuggests" :key="index">
    <span class="tag">{{ item.tagText.text }}</span>
  </template>
</div>4. 搜索按钮
<!-- 搜索按钮 -->
<div class="item search-btn">
  <div class="btn" @click="searchBtnClick">开始搜索</div>
</div>

// 点击搜索按钮
let searchBtnClick = () => {
  router.push({
    path: '/search',
    query: {
      startDate: startDate.value,
      endDate: endDate.value,
      currentCity: currentCity.value.cityName
    }
  })
}注意:Search 组件不开发,只需在 Search 组件中能拿到路由传过来的参数并打印即可。
四、Categories
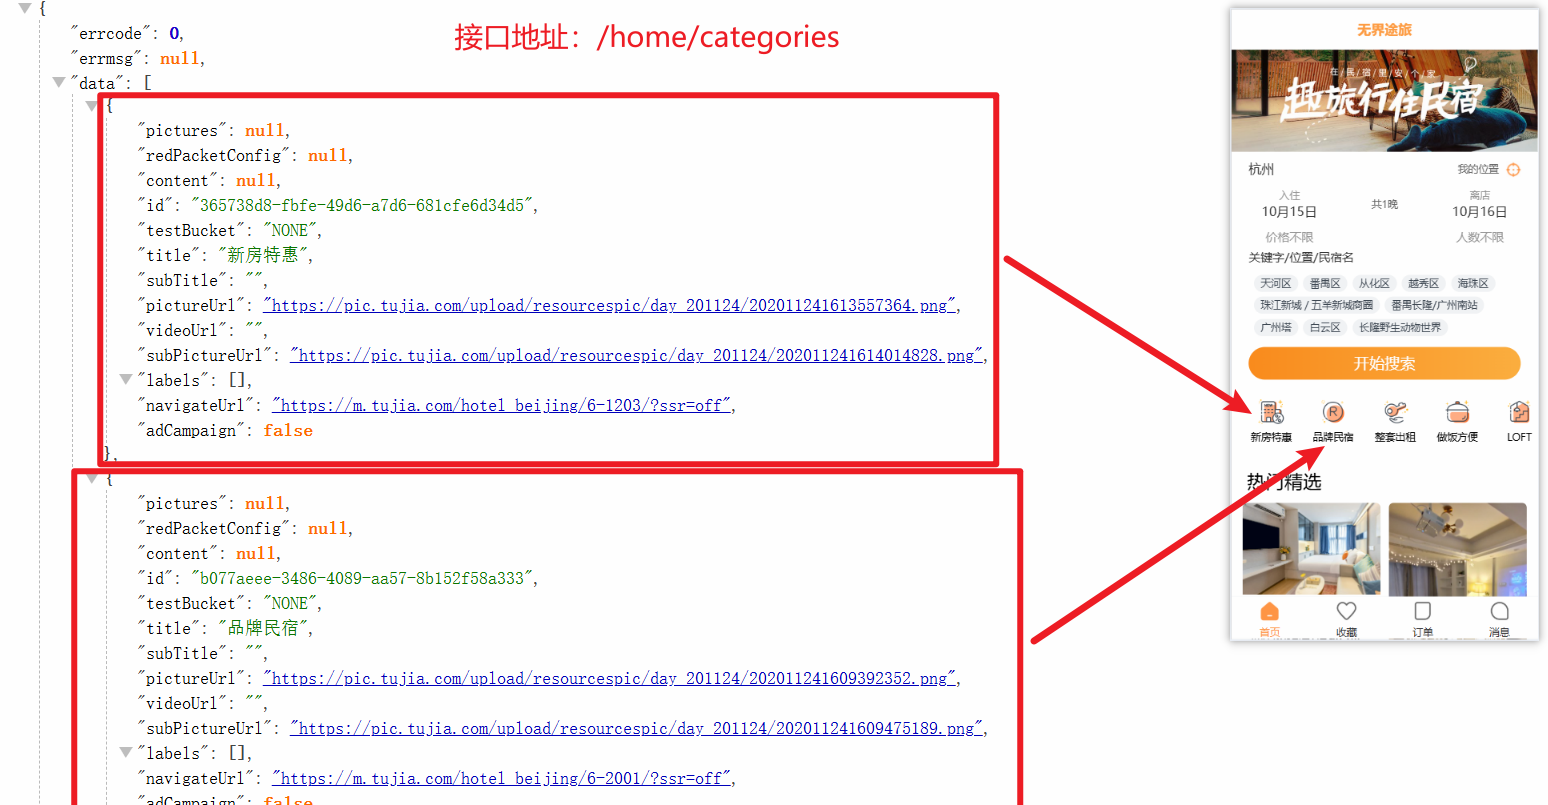
1)封装 API
@/service/modules/home.js
export function getCategories () {
  return DDFRequest.get('/home/categories')
}2)请求网络的数据封装到 actions
@/stores/modules/home.js
import { defineStore } from 'pinia'

import { getCategories } from '@/service'

export default defineStore('home', {
  state: () => ({
    // 省略...
    categories: []
  }),
  actions: {
    // 省略...
    fetchCategoriesData () {
      getCategories().then(res => {
        this.categories = res.data
      })
    }
  }
})3)Home 组件中请求数据,存到 pinia 中
@/views/home/home.vue
import useHomeStore from '@/stores/modules/home'
let homeStore = useHomeStore()
homeStore.fetchCategoriesData()4)@/views/home/cpns/home-categories.vue 中展示数据
<script setup>
import useHomeStore from '@/stores/modules/home'
// 热门民宿关键字
const homeStore = useHomeStore()
const { categories } = storeToRefs(homeStore)
</script>

<template>
  <div class="categories">
    <template v-for="(item, index) in categories" :key="item.id">
      <div class="item">
        <img :src="item.pictureUrl" alt="" />
        <div class="text">{{ item.title }}</div>
      </div>
    </template>
  </div>
</template>五、HomeContent
1. 获取数据
1)封装 API
@/service/modules/home.js
export function getHouselist (currentPage) {
  return DDFRequest.get('/home/houselist', {
    page: currentPage
  })
}2)请求网络的数据封装到 actions
@/stores/modules/home.js
import { defineStore } from 'pinia'

import { getCategories } from '@/service'

export default defineStore('home', {
  state: () => ({
    // 省略...
    currentPage: 1,
    houselist: []
  }),
  actions: {
    // 省略...
    async fetchHouselistData () {
      const res = await getHouselist(this.currentPage)
      this.houselist.push(...res.data)
      this.currentPage++
    }
  }
})3)Home 组件中请求数据,存到 pinia 中
@/views/home/home.vue
import useHomeStore from '@/stores/modules/home'
let homeStore = useHomeStore()
homeStore.fetchHouselistData() // 初始化 (一上来就) 获取页面数据

function nextPage(){
  homeStore.fetchHouselistData()
}

<button @click='nextPage'>加载更多数据</button>2. 展示数据
1)编写 v9、v3 组件
@/components/house-item-v3/house-item-v3.vue
@/components/house-item-v9/house-item-v9.vue
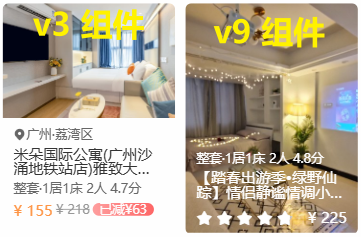
2)在 HomeContent 组件中使用 v9、v3 组件
@/views/home/cpns/home-content.vue
<div class="list">
  <template v-for="(item, index) in houselist" :key="item.data.houseId">
    <house-item-v9
      v-if="item.discoveryContentType === 9"
      :item-data="item.data"
    />
    <house-item-v3
      v-else-if="item.discoveryContentType === 3"
      :item-data="item.data"
    />
  </template>
</div>

<style>
  .list {
    display: flex;
    flex-wrap: wrap;
  }
<style>3. 滑到底部加载数据
1)@/hooks/useScroll.js
点我查看代码
import { onActivated, onDeactivated, onMounted, onUnmounted, ref } from 'vue'
import { throttle } from 'underscore'

export default function useScroll (elRef) {
  let el = window

  const isReachBottom = ref(false)

  const clientHeight = ref(0)
  const scrollTop = ref(0)
  const scrollHeight = ref(0)

  const scrollListenerHandler = throttle(() => {
    if (el === window) {
      clientHeight.value = document.documentElement.clientHeight
      scrollTop.value = document.documentElement.scrollTop
      scrollHeight.value = document.documentElement.scrollHeight
    } else {
      clientHeight.value = el.clientHeight
      scrollTop.value = el.scrollTop
      scrollHeight.value = el.scrollHeight
    }

    if (clientHeight.value + scrollTop.value + 1 >= scrollHeight.value) {
      console.log('滚动到底部了!')
      isReachBottom.value = true
    }
  }, 100)

  onMounted(() => {
    if (elRef) el = elRef.value
    el.addEventListener('scroll', scrollListenerHandler)
  })

  onUnmounted(() => {
    el.removeEventListener('scroll', scrollListenerHandler)
  })

  onActivated(() => {
    if (elRef) el = elRef.value
    el.addEventListener('scroll', scrollListenerHandler)
  })

  onDeactivated(() => {
    el.addEventListener('scroll', scrollListenerHandler)
  })

  return { isReachBottom, clientHeight, scrollTop, scrollHeight }
}2)使用
@/views/home/home.vue
// 监听滚动到底部
const { isReachBottom, scrollTop } = useScroll()
watch(isReachBottom, newValue => {
  if (newValue) {
    homeStore.fetchHouselistData().then(() => {
      isReachBottom.value = false // 数据请求完成后, 重置 isReachBottom
    })
  }
}六、加载中动画
思路:① 编写 loading 界面,用一个变量控制 loading 是否展示。② 把 loading 界面引入到 APP 组件下。③ 使用 axios 的拦截器,控制显示。
1. 编写加载动画组件
@/components/loading/loading.vue
点我查看代码
<template>
  <div class="loading">
    <div class="bg">
      <img src="@/assets/img/home/full-screen-loading.gif" alt="" />
    </div>
  </div>
</template>

<style lang="less" scoped>
.loading {
  position: fixed;
  z-index: 999;
  left: 0;
  right: 0;
  top: 0;
  bottom: 0;
  display: flex;
  justify-content: center;
  align-items: center;

  background-color: rgba(0, 0, 0, 0.2);

  .bg {
    display: flex;
    justify-content: center;
    align-items: center;
    width: 104px;
    height: 104px;
    background: url(@/assets/img/home/loading-bg.png) 0 0 / 100% 100%;

    img {
      width: 70px;
      height: 70px;
      margin-bottom: 10px;
    }
  }
}
</style>2. 使用组件
@/App.vue
<template>
  <router-view></router-view>
  <TabBar />
  <loading />
</template>3. 控制显示与隐藏
1)把控制显示与隐藏的变量存储到 pinia 中
@/stores/modules/main.js
import { defineStore } from 'pinia'

const useMainStore = defineStore('main', {
  state: () => ({
    isLoading: false
  })
})

export default useMainStore2)当请求数据的时候就显示,完成后就隐藏。
@/service/request/index.js
class DDFRequest {
  constructor (baseURL, timeout) {
    // ......
    this.instance.interceptors.request.use(
      config => {
        mainStore.isLoading = true
        return config
      },
      err => {
        return err
      }
    )
    this.instance.interceptors.response.use(
      res => {
        mainStore.isLoading = false
        return res
      },
      err => {
        mainStore.isLoading = false
        return err
      }
    )
  }
  // ......
}

export default new DDFRequest(BASE_URL, TIMEOUT)3)给加载动画的根标签添加 v-if 指令。
@/components/loading/loading.vue
<template>
  <div class="loading" v-if="mainStore.isLoading">
    // ......
  </div>
</template>

<script setup>
import useMainStore from '@/stores/modules/main'
const mainStore = useMainStore()
</script>4)细节优化:用户单击加载动画的时候也能够隐藏。
@/components/loading/loading.vue
<template>
  <div class="loading" v-if="mainStore.isLoading" @click="loadingClick">
    // ......
  </div>
</template>

<script setup>
const loadingClick = () => {
  mainStore.isLoading = false
}
</script>第三章:city 页
一、跳转
1)创建 @/views/city/city.vue 文件
2)配置路由 @/router/index.js
const routes = [
  // ……
  { path: '/city', component: () => import('@/views/city/city.vue') }
]小贴士:可以在浏览器地址栏敲这个路由,如果能访问到该页面,在进行编程式导航。
3)页面点击跳转
let router = useRouter()
const cityClick = () => {
  router.push('/city')
}

<div class="city" @click="cityClick">杭州</div>4)隐藏 tab-bar 组件
/* 方法一 */
/*
  思路:
    1. 编写隐藏 TabBar 的样式
    2. 在要隐藏 TabBar 的组件上添加 class="top-page", 最好在根标签上应用
*/

/* ---------------------------  实现 --------------------------- */

/* @/assets/css/common.css */
.top-page { /* 应用此样式的路由界面,将隐藏底部导航栏 */
  position: relative;
  z-index: 9;
  height: 100vh;
  background-color: #fff;
  overflow-y: auto;
}

/* @/views/city/city.vue */
<div class="city top-page">
  // 搜索框
  // 热门城市
  // 城市列表
</div>/* 方法二 */
/*
思路:
1. 在要隐藏 TabBar 的路由配置里加入 meta 属性,内容为 {hidden: true}
2. 在使用 TabBar 的标签上添加 v-show="!route.meta.hidden"
*/
/* --------------------------- 实现 --------------------------- */
/* @/router/index.js */
const routes = [
{ path: '/city', component: () => import('@/views/city/city.vue'), meta: {hiddenTabBar: true} }
]
/* @/App.vue */
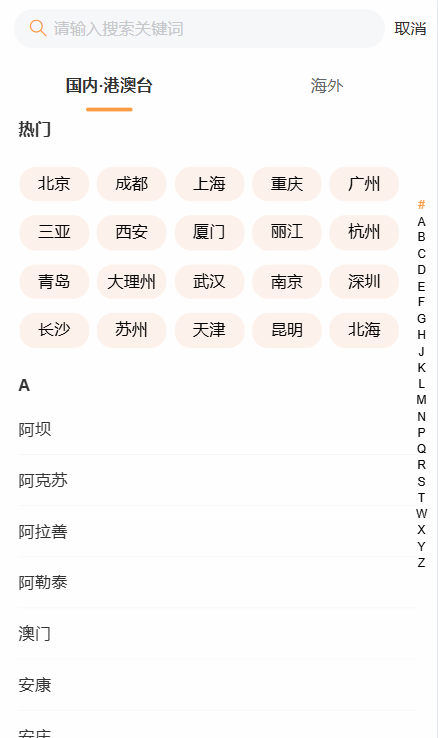
<TabBar v-show="!route.meta.hiddenTabBar" />二、搜索栏
查看官方文档:Search 搜索 -- 表单组件
<template>
  <!-- ...... -->
  <van-search
    name="keyword"  <!-- 名称,作为提交表单时的标识符 -->
    v-model="searchValue"
    placeholder="请输入搜索关键词"
    shape="round"
    show-action  <!-- 是否在搜索框右侧显示取消按钮 -->
    @cancel="cancelClick"  <!-- 点击取消按钮时触发 -->
  />
  <!-- ...... -->
</template>

<script setup>
let router = useRouter();
const cancelClick = () => {
  router.back();
}
</script>三、选项卡
查看官方文档:Tab 标签页 -- 导航组件
1. 封装请求 API
为每个组件的请求地址等写到不同的 js 中。
新建 @/service/modules/city.js 文件
import DDFRequest from '../request'

export function getCityList(){
  return DDFRequest.get('/city/all')
}在 @/service/index.js 中统一暴露
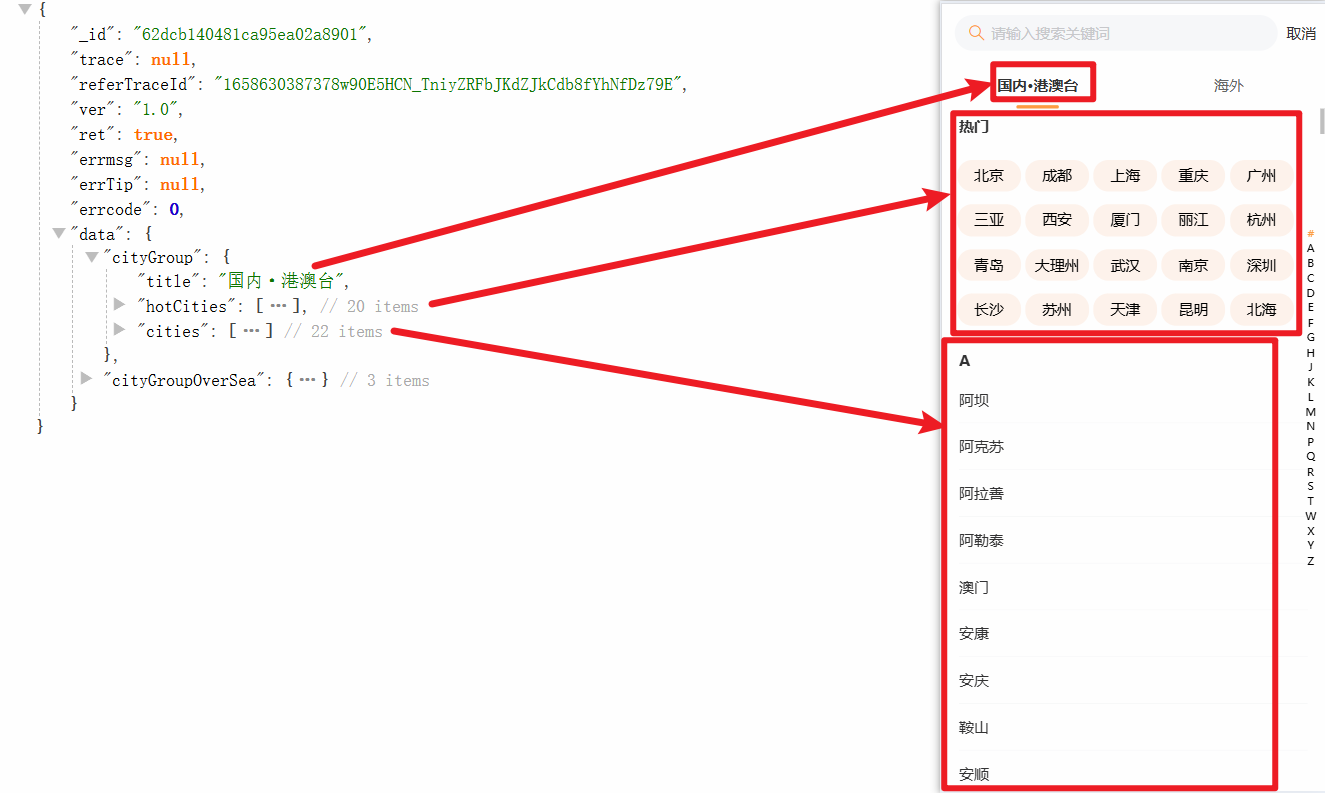
export * from './modules/city'2. 动态数据展示选项卡标题
1)把数据存到 store
为什么需要把数据存到 store?
- 这个数据在子组件中也要使用,使用 props 不方便维护。
- 组件中将会有大量的发送网络请求的代码跟业务逻辑,要把 view 与业务逻辑分离。
@/store/modules/city.js
import { defineStore } from 'pinia'

import { getCityList } from '@/service/index'

const useCityStore = defineStore("city", {
  state: () => ({
    cityList: {}
  }),
  actions: {
    async fetchCityList() {
      const res = await getCityList() // 在此处发起网络请求
      this.cityList = res.data
    }
  }
})

export default useCityStore2)展示数据
@/views/city/city.vue
<script setup>
import { storeToRefs } from 'pinia';
import useCityStore from '@/stores/modules/city'

let cityStore = useCityStore();
cityStore.fetchCityList();
let { cityList } = storeToRefs(cityStore);
</script>

<template>
  <van-tabs v-model:active="tabActive" color="#f9854">
    <template v-for="(value,key,index) in cityList" :key="key">
      <van-tab :title="value.title"></van-tab>
    </template>
  </van-tabs>
</template>四、内容区
1. 动态数据 cityGroup 切换
<script setup>
  // 此处必须使用 computed,否则不是响应式数据。如果理解不了,可以在 template 中把 cityList 换为 cityList[tabActive].cities
  let currentGroup = computed(()=>cityList.value[tabActive.value])
</script>

<template>
  <!-- ...... -->
  <van-tabs v-model:active="tabActive" color="#f9854">
    <template v-for="(value,key,index) in cityList" :key="key">
      <van-tab :title="value.title" :name="key"></van-tab>
    </template>
  </van-tabs>
  <!-- ...... -->

  <div class="content">
    {{currentGroup}}
  </div>
</template>

<style lang="less" scoped>
  .content {
    height: calc(100vh - 98px);
    overflow-y: auto;
  }
</style>2. 城市列表展示
查看官方文档:IndexBar 索引栏 -- 导航组件
1)在 @/views/city/cpns 中新建 city-group.vue 文件
2)@/views/city/city.vue 中引入这个组件
<div class="content">
  <CityGroup :currentGroup="currentGroup" />
</div>3)city-group.vue 接受 props,之后遍历展示
<script setup>
defineProps({
  currentGroup: {
    type: Object,
    required: true,
    default: () => ({})
  }
})
</script>

<template>
  <van-index-bar :sticky="false">
    <template v-for="item in currentGroup.cities">
      <van-index-anchor :index="item.group" />
      <template v-for="item in item.cities">
        <van-cell :title="item.cityName" />
      </template>
    </template>
  </van-index-bar>
</template>4)自定义索引列表
let indexList = []
watch(()=>props.currentGroup,()=>{
  console.log("传递过来的数据", props.currentGroup)
  indexList = ["#", ...props.currentGroup.cities.map(item=>item.group)]
})

<van-index-bar :sticky="false" :index-list="indexList">坑:解决vue中父组件通过props向子组件传递数据,子组件接收不到 / vue3子组件拿不到defineprops中的值
3. 热门城市
<van-index-anchor index="#">热门</van-index-anchor>
<div class="list">
  <template v-for="item in currentGroup.hotCities">
    <div class="city">{{ item.cityName }}</div>
  </template>
</div>css 代码:
.list {
  display: flex;
  flex-wrap: wrap;
  justify-content: space-evenly;
  padding: 10px;
  padding-right: 25px;

  .city {
    width: 60px;
    height: 30px;
    line-height: 30px;
    text-align: center;
    background-color: #FEF3EC;
    border-radius: 14px;
    margin: 6px 0;
  }
}五、回退 + 回显
1)回退
const cityStore = useCityStore()
const cityClick = function (city) {
  cityStore.currentCity = city
  router.back()
}

<van-cell :title="item.cityName" @click="cityClick(item)" />
<div class="city" @click="cityClick(item)">{{ item.cityName }}</div>2)回显
@/views/home/cpns/home-search-box.vue
// 展示当前所在城市
const cityStore = useCityStore()
let { currentCity } = storeToRefs(cityStore)

<div class="city" @click="cityClick">{{ currentCity.cityName }}</div>第四章:详情页
一、跳转
1)编写详情页组件
<script setup>
</script>

<template>
  <!-- top-page 样式用来隐藏 TabBar -->
  <div class="detail top-page">
    detail
  </div>
</template>

<style lang="less" scoped>
</style>2)注册路由
@/router/index.js
const routes = [
  { path: '/detail/:id', component: () => import('@/views/detail/detail.vue') }
]3)在 HomeContent 组件的遍历 v3、v9 组件中添加 @click。
@/views/home/cpns/home-content.vue
const router = useRouter()
const itemClick = item => {
  // 跳转到Detail页面
  router.push('/detail/' + item.houseId)
}4)拿到民宿的 ID
const route = useRoute()
const houseId = route.params.id二、NavBar
查看官方文档:NavBar 导航栏 -- 导航组件
@/views/detail/detail.vue
<van-nav-bar
  title="房屋详情"
  left-text="返回"
  left-arrow
  @click-left="onClickLeft"
/>

const router = useRouter()
// 监听返回按钮的点击
const onClickLeft = () => {
  router.back()
}二、轮播图
查看官方文档:Swipe 轮播 -- 展示组件
1. 封装网络请求
1)新建 @/service/modules/detail.js 文件用来管理网络请求配置。
export function getDetailInfos (houseId) {
  return DDFRequest.get('/detail/infos', {
    houseId
  })
}2)在 @/views/detail/detail.vue 中发起网络请求,数据存到这个页面中。不往 store 存了,因为我们需要两个存数据方法都要了解。
const route = useRoute()
const houseId = route.params.id

// 发送网络请求,获取房屋详细信息
const detailInfos = ref({})
getDetailInfos(houseId).then(res => {
  detailInfos.value = res.data
})
// 返回的数据太复杂了,进一步取出此页面需要的数据
const mainPart = computed(() => detailInfos.value.mainPart)2. 展示数据
1)新建 @/views/detail/cpns/detail_01-swipe.vue 文件,使用 vant 组件。
<!-- 子组件展示 props 数据 -->
<van-swipe :autoplay="3000" indicator-color="white">
  <template v-for="(item, index) in swipeData">
    <van-swipe-item class="item">
      <img :src="item.url" alt="">
    </van-swipe-item>
  </template>
</van-swipe>2)@/views/detail/detail.vue 中引入 detail_01-swipe.vue,且 proops 传递所需数据。
import DetailSwipe from "./cpns/detail_01-swipe.vue"

// ......
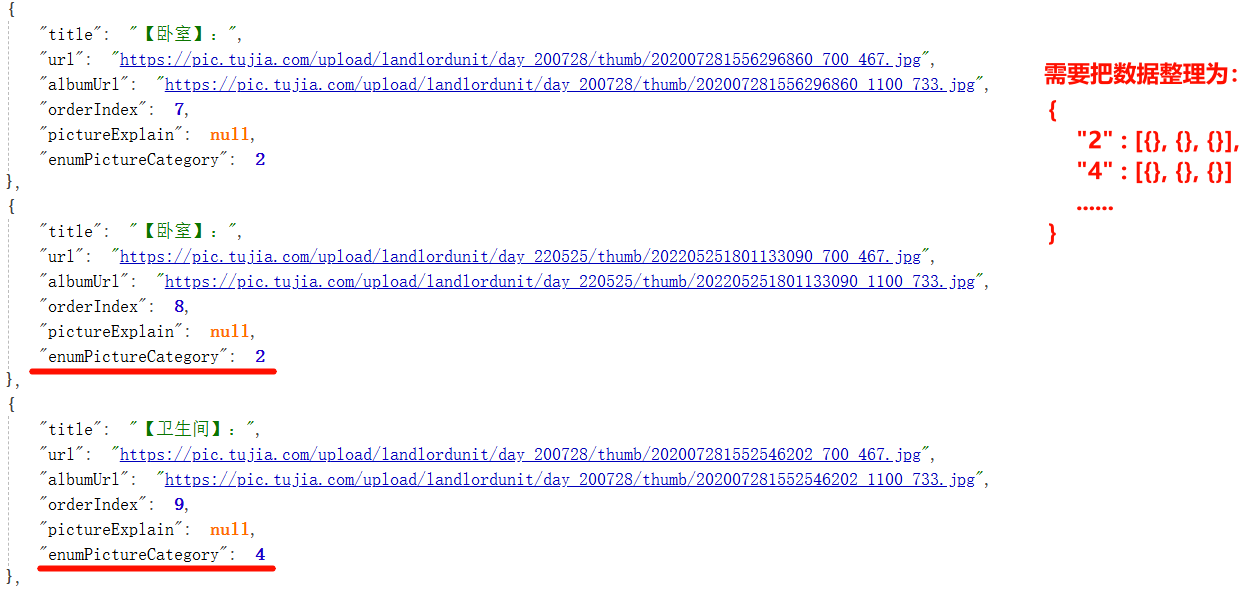
<detail-swipe :swipe-data="mainPart.topModule.housePicture.housePics"/>3. 数据处理
1)轮播图展示
swipeData 存放的数据是数组,数组中放的数据是一个个对象,如下。
const props = defineProps({
  swipeData: {
    type: Array,
    default: () => []
  }
})

// 对数据进行转换
const swipeGroup = {}

// 思路二: 一次循环
for (const item of props.swipeData) {
  let valueArray = swipeGroup[item.enumPictureCategory]
  if (!valueArray) {
    valueArray = []
    swipeGroup[item.enumPictureCategory] = valueArray
  }
  valueArray.push(item)
}

// 思路一: 好理解, 两次循环
for (const item of props.swipeData) {
  swipeGroup[item.enumPictureCategory] = []
}
for (const item of props.swipeData) {
  const valueArray = swipeGroup[item.enumPictureCategory]
  valueArray.push(item)
}2)指示器展示
active, total 是 van 组件库提供的(作用域插槽)。active 是显示的图片在总图片的索引;total 是图片总数。
<template #indicator="{ active, total }">
  <div class="indicator">
    <template v-for="(value, key, index) in swipeGroup" :key="key">
      <span
        class="item"
        :class="{ active: swipeData[active]?.enumPictureCategory == key }"
      >
        <span class="text">{{ getName(value[0].title) }}</span>
        <span class="count" v-if="swipeData[active]?.enumPictureCategory == key">
          {{ getCategoryIndex(swipeData[active]) }}/{{ value.length }}
        </span>
      </span>
    </template>
  </div>
</template>// 定义转换数据的方法
const nameReg = /【(.*?)】/i
const getName = (name) => {
// return name.replace(":", "").replace("】", "").replace("【", "")
const results = nameReg.exec(name)
return results[1]
}
// 查找图片在组中是第几个
const getCategoryIndex = (item) => {
const valueArray = swipeGroup[item.enumPictureCategory]
return valueArray.findIndex(data => data === item) + 1
}三、TabControl
这里使用自己封装的组件,但是也可以使用 vant 的 Tab 标签页。
1. 封装 TabControl 组件
新建 @/components/tab-control/tab-control.vue 组件。
点我查看代码
<template>
  <div class="tab-control">
    <template v-for="(item, index) in titles" :key="item">
      <div
        class="tab-control-item"
        :class="{ active: index === currentIndex }"
        @click="itemClick(index)"
      >
        <span>{{ item }}</span>
      </div>
    </template>
  </div>
</template>

<script>
export default {
  props: {
    titles: {
      type: Array,
      default: () => []
    }
  },
  data () {
    return {
      currentIndex: 0
    }
  },
  emits: ['tabItemClick'],
  methods: {
    itemClick (index) {
      this.currentIndex = index
      this.$emit('tabItemClick', index)
    },
    setCurrentIndex (index) {
      this.currentIndex = index
    }
  }
}
</script>

<style lang="less" scoped>
.tab-control {
  display: flex;
  height: 44px;
  line-height: 44px;
  text-align: center;
  background-color: #fff;
}

.tab-control-item {
  flex: 1;
}

.tab-control-item.active {
  color: var(--primary-color);
  font-weight: 700;
}

.tab-control-item.active span {
  border-bottom: 3px solid var(--primary-color);
  padding: 8px;
}
</style>2. TabControl 的显示与隐藏
// TabControl 的显示与隐藏
const detailRef = ref()
const { scrollTop } = useScroll(detailRef)
const showTabControl = computed(() => {
  return scrollTop.value >= 300
})

<div class="detail top-page" ref="detailRef">
</div>3. TabControl 动态数据
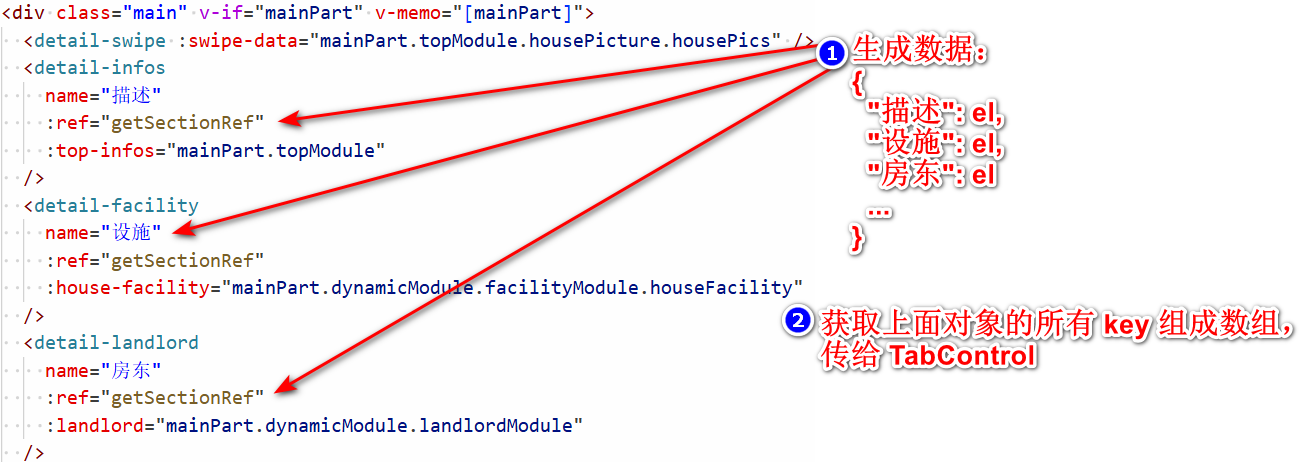
@/views/detail/detail.vue
1)在详情页的每个组件上添加 name 属性和绑定一个函数。例如:name="描述" :ref="getSectionRef"
<div class="main" v-if="mainPart" v-memo="[mainPart]">
  <detail-swipe :swipe-data="mainPart.topModule.housePicture.housePics"/>
  <detail-infos name="描述" :ref="getSectionRef" :top-infos="mainPart.topModule"/>
  <detail-facility name="设施" :ref="getSectionRef" :house-facility="mainPart.dynamicModule.facilityModule.houseFacility"/>
  <detail-landlord name="房东" :ref="getSectionRef" :landlord="mainPart.dynamicModule.landlordModule"/>
  <detail-comment name="评论" :ref="getSectionRef" :comment="mainPart.dynamicModule.commentModule"/>
  <detail-notice name="须知" :ref="getSectionRef" :order-rules="mainPart.dynamicModule.rulesModule.orderRules"/>
  <detail-map name="周边" :ref="getSectionRef" :position="mainPart.dynamicModule.positionModule"/>
  <detail-intro :price-intro="mainPart.introductionModule"/>
</div>2)TabControl 的每一个选项都取自 name 属性
const sectionEls = ref({}) // { "描述": el,"设施": el,"房东": el }
const getSectionRef = value => {
  if (!value) return
  const name = value.$el.getAttribute('name')
  sectionEls.value[name] = value.$el
}

// 用于给 TabControl 传递 titles 数据
const names = computed(() => {
  return Object.keys(sectionEls.value)
})3)使用封装好的 TabControl 组件
<tab-control
  v-if="showTabControl"
  class="tabs"
  :titles="names"
  @tabItemClick="tabClick"
  ref="tabControlRef"
/>4. TabControl 被点击时,滚动到对应的位置
用户点击 Tab "设施"
    ↓
获取 index = 1
    ↓
找到对应 DOM 元素 (el)
    ↓
计算滚动位置: offsetTop - 44 = 500px
    ↓
设置标志: isClick = true, currentDistance = 500
    ↓
执行平滑滚动到 500px
    ↓
【滚动过程中】
    ├─ 触发 scroll 事件 (scrollTop = 100, 200, 300...)
    ├─ watch 监听器检测到 isClick = true
    └─ 跳过自动更新 Tab 高亮
    ↓
【滚动完成】
    ├─ scrollTop = 500 (等于 currentDistance)
    ├─ isClick = false (解除标志)
└─ 恢复正常的自动高亮功能代码实现:
let currentDistance = -1
let isClick = false
const tabClick = (index) => {
  const key = Object.keys(sectionEls.value)[index]
  const el = sectionEls.value[key]
  let instance = el.offsetTop
  if (index !== 0) {
    instance = instance - 44
  }

  isClick = true
  currentDistance = instance

  detailRef.value.scrollTo({
    top: instance,
    behavior: "smooth"
  })
}5. 根据滚动位置,设置 TabControl 选中项
用户滚动页面
    ↓
监听 scrollTop 变化
    ↓
遍历所有区域的 offsetTop
    ↓
判断: 当前区域是否在某个区域里面?
    ├─ 是 → index = i - 1, break (找到了分界点)
    └─ 否 → 继续遍历
        └─ 所有区域都已滚过 → index 保持为 values.length - 1
    ↓
更新 TabControl 高亮项代码实现:
// tabControl 相关的操作
const tabControlRef = ref()
watch(scrollTop, newValue => {
  const values = Object.values(sectionEls.value)
  let index = values.length - 1
  for (let i = 0; i < values.length; i++) {
    const el = values[i]
    let instance = el.offsetTop
    if (instance > newValue + 44) {
      console.log(i, instance, newValue + 44)
      index = i - 1
      break
    }
  }

  if (!isClick) {
    tabControlRef.value?.setCurrentIndex(index)
  } else if (currentDistance === newValue) {
    isClick = false
  }
})