
无界途旅项目
第一章:项目搭建
一、初始化项目
1.使用脚手架创建项目
npm create vue@latest2.删除项目无用文件
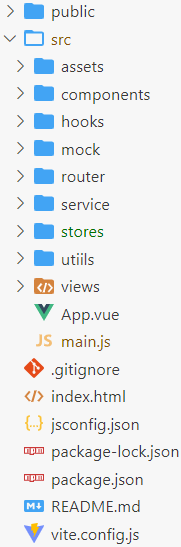
3.搭建项目目录结构
4.运行项目
二、CSS 样式
1. CSS 样式的重置
normalize.css
1)安装 normalize.css
npm install --save normalize.css2)在 src/main.js 中引入 normalize.css
import 'normalize.css'reset.css
在 src/assets/css 目录下添加 reset.css
/* http://meyerweb.com/eric/tools/css/reset/
   v2.0 | 20110126
   License: none (public domain)
*/

html, body, div, span, applet, object, iframe,
h1, h2, h3, h4, h5, h6, p, blockquote, pre,
a, abbr, acronym, address, big, cite, code,
del, dfn, em, img, ins, kbd, q, s, samp,
small, strike, strong, sub, sup, tt, var,
b, u, i, center,
dl, dt, dd, ol, ul, li,
fieldset, form, label, legend,
table, caption, tbody, tfoot, thead, tr, th, td,
article, aside, canvas, details, embed,
figure, figcaption, footer, header, hgroup,
menu, nav, output, ruby, section, summary,
time, mark, audio, video {
	margin: 0;
	padding: 0;
	border: 0;
	font-size: 100%;
	font: inherit;
	vertical-align: baseline;
}

a {
  text-decoration: none;
  color: inherit;
}

/* HTML5 display-role reset for older browsers */
article, aside, details, figcaption, figure,
footer, header, hgroup, menu, nav, section {
	display: block;
}
body {
	line-height: 1;
}
ol, ul {
	list-style: none;
}
blockquote, q {
	quotes: none;
}
blockquote:before, blockquote:after,
q:before, q:after {
	content: '';
	content: none;
}
table {
	border-collapse: collapse;
	border-spacing: 0;
}2. 组织 CSS
1)在 src/assets/css 目录下创建 common.css
2)在 src/assets/css 目录下创建 index.css
3)在 index.css 中引入其他 CSS 文件
@import 'reset.css';
@import 'common.css';4)在 src/main.js 中引入 index.css
import '@/assets/css/index.css'5)项目添加 less 依赖(后面用到)
npm install less -D三、路由配置
1.安装路由
npm install vue-router@42.配置:在 src/router/ 新建 index.js 文件,用于配置路由
import { createRouter, createWebHashHistory } from 'vue-router'

const routes = [
  { path: '/', redirect: '/home' },
  { path: '/home', component: () => import('@/views/home/home.vue') },
  { path: '/favor', component: () => import('@/views/favor/favor.vue') },
  { path: '/order', component: () => import('@/views/order/order.vue') },
  { path: '/message', component: () => import('@/views/message/message.vue') },
]

const router = createRouter({
  history: createWebHashHistory(),
  routes
})

export default router3.集成:在 src/main.js 中引入 vue-router 插件
import router from '@/router'

// ......

createApp(App).use(router).mount('#app')4.使用
1)编写每一个路由页面
以 Home 组件为例,其他一样。
<script>
  export default {

  }
</script>

<template>
  <div class="home">
    home
  </div>
</template>

<style lang="less" scoped>

</style>2)在 src/App.vue 中添加路由导航等
<router-view></router-view>
<router-link to="/home">首页</router-link>
<router-link to="/favor">收藏</router-link>
<router-link to="/order">订单</router-link>
<router-link to="/message">消息</router-link>
四、状态管理
1.安装 pinia
npm install pinia2.配置:在 src/stores 目录下新建 index.js
import {createPinia} from 'pinia'

const store = createPinia()

export default store3.集成:在 src/main.js 中引入 pinia 插件
import pinia from '@/stores'

// ......

createApp(App).use(router).use(pinia).mount('#app')4.使用
新建 src/stores/modules/city.js
import {defineStore} from 'pinia'

const useCityStore = defineStore("city",{
    state: () => ({
    }),
    actions: {
    }
})

export default useCityStore第二章:底部导航栏
tab-bar 组件。
一、结构搭建
1. 定义 tab-bar 组件
新建 src/components/tab-bar/tab-bar.vue
<script>
  export default {

  }
</script>

<template>
  <div class="tab-bar">
    tab-bar
  </div>
</template>

<style lang="less" scoped>

</style>2. App 组件里引入 tab-bar
src/App.vue
<script setup>
  // 1.引入
  import TabBar from '@/components/tab-bar/tab-bar.vue'
</script>

<template>
  <!-- 2.使用 -->
  <TabBar/>
</template>
3. 编写 tab-bar 组件
<script>
  export default {

  }
</script>

<template>
  <div class="tab-bar">
    <router-link to="/home">
      <img src="@/assets/img/tabbar/tab_home.png" alt="">
      <span>首页</span>
    </router-link>
    <router-link to="/favor">
      <img src="@/assets/img/tabbar/tab_favor.png" alt="">
      <span>收藏</span>
    </router-link>
    <router-link to="/order">
      <img src="@/assets/img/tabbar/tab_order.png" alt="">
      <span>订单</span>
    </router-link>
    <router-link to="/message">
      <img src="@/assets/img/tabbar/tab_message.png" alt="">
      <span>消息</span>
    </router-link>
  </div>
</template>

<style lang="less" scoped>
  .tab-bar {
    position: fixed;
    bottom: 0;
    left: 0;
    right: 0;
    height: 50px;
    display: flex;

    &>a {
      display: flex;
      flex: 1;
      flex-direction: column;
      justify-content: center;
      align-items: center;

      img {
        width: 34px;
        height: 34px;
      }
    }
  }
</style>
二、TabBar 动态数据
1.新建 src/assets/data/tabbar.js
export default [
  {
    text: '首页',
    image: "tabbar/tab_home.png",
    imageActive: "tabbar/tab_home_active.png",
    path: '/home'
  },
  {
    text: '收藏',
    image: "tabbar/tab_favor.png",
    imageActive: "tabbar/tab_favor_active.png",
    path: '/favor'
  },
  {
    text: '订单',
    image: "tabbar/tab_order.png",
    imageActive: "tabbar/tab_order_active.png",
    path: '/order'
  },
  {
    text: '消息',
    image: "tabbar/tab_message.png",
    imageActive: "tabbar/tab_message_active.png",
    path: '/message'
  },
]2.编写获取图片真实路径的函数
新建 @/utils/load_asserts.js
export const getAssertUrl = function (image) {
  return new URL(`../assets/img/${image}`, import.meta.url).href
}3.引入数据与工具函数,使用 v-for 指令遍历
<script setup>
  import tabbarData from '@/assets/data/tabbar'
  import { getAssertUrl } from "@/utils/load_asserts"
</script>

<template>
  <div class="tab-bar">
    <template v-for="item in tabbarData">
      <router-link :to="item.path">
        <img :src="getAssertUrl(item.image)" alt="">
        <span>{{item.text}}</span>
      </router-link>
    </template>
  </div>
</template>三、选中高亮
思路
1.定义一个变量,记录当前选中的 tab。当发生点击时,改变该变量
2.编写一个 active 类
3.使用 :class 的对象写法,判断当前 index 是否等于该 tab 的 index
<script setup>
  import { ref } from 'vue'
  // ......

  let currentIndex = ref(0)
</script>

<template>
  <div class="tab-bar">
    <template v-for="(item, index) in tabbarData">
      <router-link
       :to="item.path"
       :class="{'active': currentIndex === index}"
        @click="currentIndex = index"
      >
        <img v-if="currentIndex === index" :src="getAssertUrl(item.imageActive)" alt="">
        <img v-else :src="getAssertUrl(item.image)" alt="">
        <span>{{item.text}}</span>
      </router-link>
    </template>
  </div>
</template>第三章:Vant
Vant 是一个轻量、可定制的移动端 Vue 组件库。
官方文档:Vant 文档
一、引入 Vant
1.安装
npm i vant2.按需引入组件样式
# 安装插件
npm i @vant/auto-import-resolver unplugin-vue-components unplugin-auto-import -Dunplugin-vue-components 自动引入组件;Vant 官方基于 unplugin-vue-components 提供了自动导入样式的解析器 @vant/auto-import-resolver,两者需配合使用。
3.基于 Vite 的项目,在 vite.config.js 文件中配置插件:
// 配置插件
import AutoImport from 'unplugin-auto-import/vite';
import Components from 'unplugin-vue-components/vite';
import { VantResolver } from '@vant/auto-import-resolver';

export default {
  plugins: [
    vue(),
    AutoImport({
      resolvers: [VantResolver()],
    }),
    Components({
      resolvers: [VantResolver()],
    }),
  ],
};完成以上两步,就可以直接在模板中使用 Vant 组件了,unplugin-vue-components 会解析模板并自动注册对应的组件, @vant/auto-import-resolver 会自动引入对应的组件样式。
二、TabBar 改写
查看官方文档:Tabbar 标签栏
<template>
  <div class="tab-bar">
    <van-tabbar v-model="currentIndex" active-color="#ff9645">
      <van-tabbar-item v-for="(item, index) in tabbarData" :to="item.path" >
        {{ item.text }}
        <template #icon>
          <img v-if="currentIndex === index" :src="getAssertUrl(item.imageActive)" alt="">
          <img v-else :src="getAssertUrl(item.image)" alt="">
        </template>
      </van-tabbar-item>
    </van-tabbar>
  </div>
</template>还需要把以前自己写的无用 CSS 样式删除。
修改UI组件库的样式方法
1.官方提供了使用插槽方法来定制。
2.变量全局或局部定义,覆盖原有值。
3.属性修改。
4.f12 查看要修改样式元素的选择器,使用 Vue 提供的
:deep(select) {}
:deep(select) {}什么鬼
:deep(selector)是一个 CSS 预处理器的深度作用选择器,它可以用来样式穿透。当在一个组件中使用<style scoped>时,它的 CSS 只会应用到当前组件,不会影响到子组件。但有时候,需要改变子组件的样式。这时,就可以使用:deep(selector)。例如,有一个
.parent组件,它有一个.child组件。想改变.child组件的样式,可以这样写:css<style scoped> .parent :deep(.child) { color: red; } </style>这将会使得
.parent组件中的.child组件的文字颜色变为红色。注意,
:deep()是一个伪类,它需要配合CSS预处理器(如Less、Sass)使用。如果没有使用 CSS 预处理器,可以使用>>>来代替:deep(),如:css<style scoped> .parent >>> .child { color: red; } </style>