
Home 页面
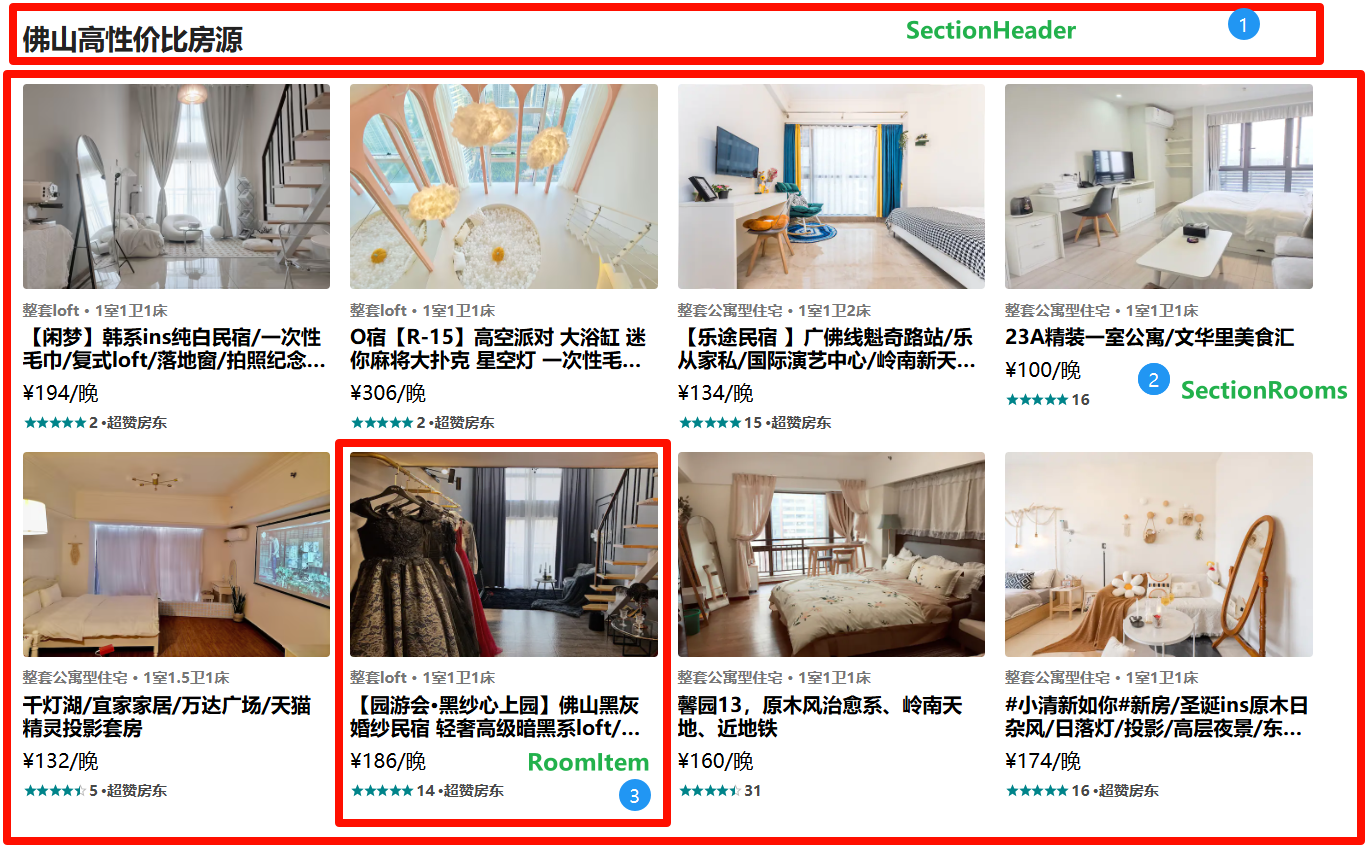
第一章:高性价比房源
一、获取数据
请求接口,把数据存到 redux 中,因此需要在 action 发起异步请求。
1. 封装 API 并暴露
@\services\modules\home.js
import request from '@/services/request'

export function getHomeGoodPriceData() {
  return request.get({
    url: "/home/goodprice"
  })
}@\services\index.js
export * from './modules/home'2. 数据存到 redux
1)定义 state 与 reducers
const homeSlice = createSlice({
  name: "home",
  initialState: {
    goodPriceInfo: [],
  },
  reducers: {
    setGoodPriceInfo: (state, action) => {
      state.goodPriceInfo = action.payload
    },
  },
});

export const { setGoodPriceInfo } = homeSlice.actions2)@\store\features\home.js 中创建异步 action
import { createAsyncThunk } from "@reduxjs/toolkit"
import { getHomeGoodPriceData } from "@/services"

export const fetchGoodPriceInfo = createAsyncThunk("goodPrice/fetchGoodPriceInfo", async () => {
  const response = await getHomeGoodPriceData()
  return response
})3)定义异步 action 的 Reducer
extraReducers: (builder) => {
  builder.addCase(fetchGoodPriceInfo.fulfilled, (state, action) => {
    state.goodPriceInfo = action.payload
  })
},3. 页面发起请求
@\views\home\index.jsx
import React, { useEffect } from 'react'
import { shallowEqual, useDispatch, useSelector } from 'react-redux'
import { fetchGoodPriceInfo } from '@/store/features/home'

const { goodPriceInfo } = useSelector(state => ({
  goodPriceInfo: state.home.goodPriceInfo
}), shallowEqual)

const dispatch = useDispatch()
useEffect(() => {
  dispatch(fetchGoodPriceInfo())
}, [dispatch])二、界面布局
1. Home
@\views\home\index.jsx
用 CSS 美化界面,使用花括号展示数据。
<HomeWrapper>
  <HomeBanner></HomeBanner>
  <div className='content'>
    <div className='good-price'>
      <SectionHeader title={goodPriceInfo.title}/>
      <SectionRooms roomList={goodPriceInfo.list}/>
    </div>
  </div>
</HomeWrapper>2. SectionHeader
@\components\section-header
用 CSS 美化界面,使用花括号展示数据。
const SectionHeader = memo((props) => {
  const { title, subtitle } = props

  return (
    <HeaderWrapper>
      <h2 className='title'>{title}</h2>
      { subtitle && <div className='subtitle'>{subtitle}</div> }
    </HeaderWrapper>
  )
})3. SectionRooms
@\components\section-rooms
用 CSS 美化界面,使用花括号展示数据。
const SectionRooms = memo((props) => {
  const { roomList = [] } = props

  return (
    <RoomsWrapper>
      {
        roomList.slice(0, 8)?.map(item => {
          return <RoomItem itemData={item} key={item.id}/>
        })
      }
    </RoomsWrapper>
  )
})4. RoomItem
@\components\room-item\index.jsx
用 CSS 美化界面,使用花括号展示数据。
这个界面需要使用到打分器组件:React Rating component - Material UI
<Rating
  value={itemData.star_rating ?? 5}
  precision={0.1}
  readOnly
  sx={{ fontSize: "12px", color: "#00848A", marginRight: "-1px" }}
/>第二章:高分房源
一、获取数据
请求接口,需要把数据存到 redux 中,因此需要在 action 发起异步请求。
1. 封装 API
export function getHomeHighScoreData() {
  return request.get({
    url: "/home/highscore"
  })
}2. 数据存到 redux
如果使用以前的写法,awatit getHomeGoodPriceData() 的时候,getHomeHighScoreData 请求必须要等到 getHomeGoodPriceData 完成时才可以发送,怎么办?
import { getHomeGoodPriceData, getHomeHighScoreData } from "@/services"

export const fetchHomeDataAction = createAsyncThunk("fetchdata", async (payload, {dispatch}) => {
  getHomeGoodPriceData().then((res) => {
    dispatch(setGoodPriceInfo(res))
  })
  getHomeHighScoreData().then((res) => {
    dispatch(setHighScoreInfo(res))
  })
})

const homeSlice = createSlice({
  name: "home",
  initialState: {
    highScoreInfo: [],
  },
  reducers: {
    setHighScoreInfo: (state, action) => {
      state.highScoreInfo = action.payload
    },
  },
});

export const { setHighScoreInfo } = homeSlice.actions二、页面展示
页面要展示数据,首先要在组件挂载后发送异步 Action,让数据存到 store。之后从 store 拿到数据。最后根据从 store 拿到的数据,传入组件展示。
// 从 store 拿到数据
const { goodPriceInfo, highScoreInfo } = useSelector(state => ({
  goodPriceInfo: state.home.goodPriceInfo,
  highScoreInfo: state.home.highScoreInfo
}), shallowEqual)

// 发起异步 Action 任务,请求数据
const dispatch = useDispatch()
useEffect(() => {
  dispatch(fetchHomeDataAction())
}, [dispatch])

// 根据从 store 拿到的数据,传入组件展示
<div className='content'>
  <div className='good-price'>
    <SectionHeader title={goodPriceInfo.title}/>
    <SectionRooms roomList={goodPriceInfo.list}/>
  </div>
  <div className='high-score'>
    <SectionHeader title={highScoreInfo.title} subtitle={highScoreInfo.subtitle} />
    <SectionRooms roomList={highScoreInfo.list}/>
  </div>
</div>三、进一步封装组件
good-price 和 high-score 代码重复,进一步封装组件 HomeSectionV1。
@\views\home\c-cpns\home-section-v1
import React, { memo } from 'react'
import PropTypes from 'prop-types'
import { SectionV1Wrapper } from './style'
import SectionHeader from '@/components/section-header'
import SectionRooms from '@/components/section-rooms'

const HomeSectionV1  = memo((props) => {
  const { initData } = props

  return (
    <SectionV1Wrapper>
      <SectionHeader title={initData.title} subtitle={initData.subtitle} />
      <SectionRooms roomList={initData.list} />
    </SectionV1Wrapper>
  )
})

HomeSectionV1.propTypes = {
  initData: PropTypes.object.isRequired,
}

export default HomeSectionV1@\views\home\c-cpns\home-section-v1\style.jsx
import styled from "styled-components";

export const SectionV1Wrapper  = styled.div`
  margin-top: 30px;
`这样在 @\views\home\index.jsx 文件中引入 HomeSectionV1,传入数据即可。
import HomeSectionV1 from './c-cpns/home-section-v1';

<HomeWrapper>
  <HomeBanner></HomeBanner>
  <div className='content'>
    <HomeSectionV1 initData={goodPriceInfo} />
    <HomeSectionV1 initData={highScoreInfo} />
  </div>
</HomeWrapper>第三章:折扣优惠
一、获取数据
请求接口,需要把数据存到 redux 中,因此需要在 action 发起异步请求。
1. 封装 API
export function getHomeDiscountData() {
  return request.get({
    url: "/home/discount"
  })
}2. 数据存到 redux
import { getHomeDiscountData } from "@/services"

export const fetchHomeDataAction = createAsyncThunk("fetchdata", async (payload, {dispatch}) => {
  getHomeDiscountData().then((res) => {
    dispatch(setDiscountInfo(res))
  })
})

const homeSlice = createSlice({
  name: "home",
  initialState: {
    discountInfo: [],
  },
  reducers: {
    setDiscountInfo: (state, action) => {
      state.discountInfo = action.payload
    }
  },
});

export const { setDiscountInfo } = homeSlice.actions二、数据基本展示
这里每行展示 3 个,所以需要给 RoomItem 传递 width。先给 SectionRooms 传,在通过 SectionRooms 给 RoomItem 传,使用 props。
@\views\home\index.jsx
<div>
  <SectionHeader title={discountInfo.title} subtitle={discountInfo.subtitle} />
  <SectionRooms roomList={discountInfo.dest_list?.["佛山"]} itemWidth='33.333%' />
</div>然后使用 styled-components 的 props 动态样式。
width: ${props => props.itemWidth};三、选项卡展示
1. 高亮激活选项卡选项
const [activeIndex, setActiveIndex] = useState(0)

const activeTab = (index, tabName) => {
  setActiveIndex(index)
  tabClick(index, tabName)
}

tabs.map((tabName, index) => (
  <div
    key={index}
    className={classNames('item', { active: index === activeIndex })}
    onClick={() => activeTab(index, tabName)}
  >
    {tabName}
  </div>
))2. 折扣区切换
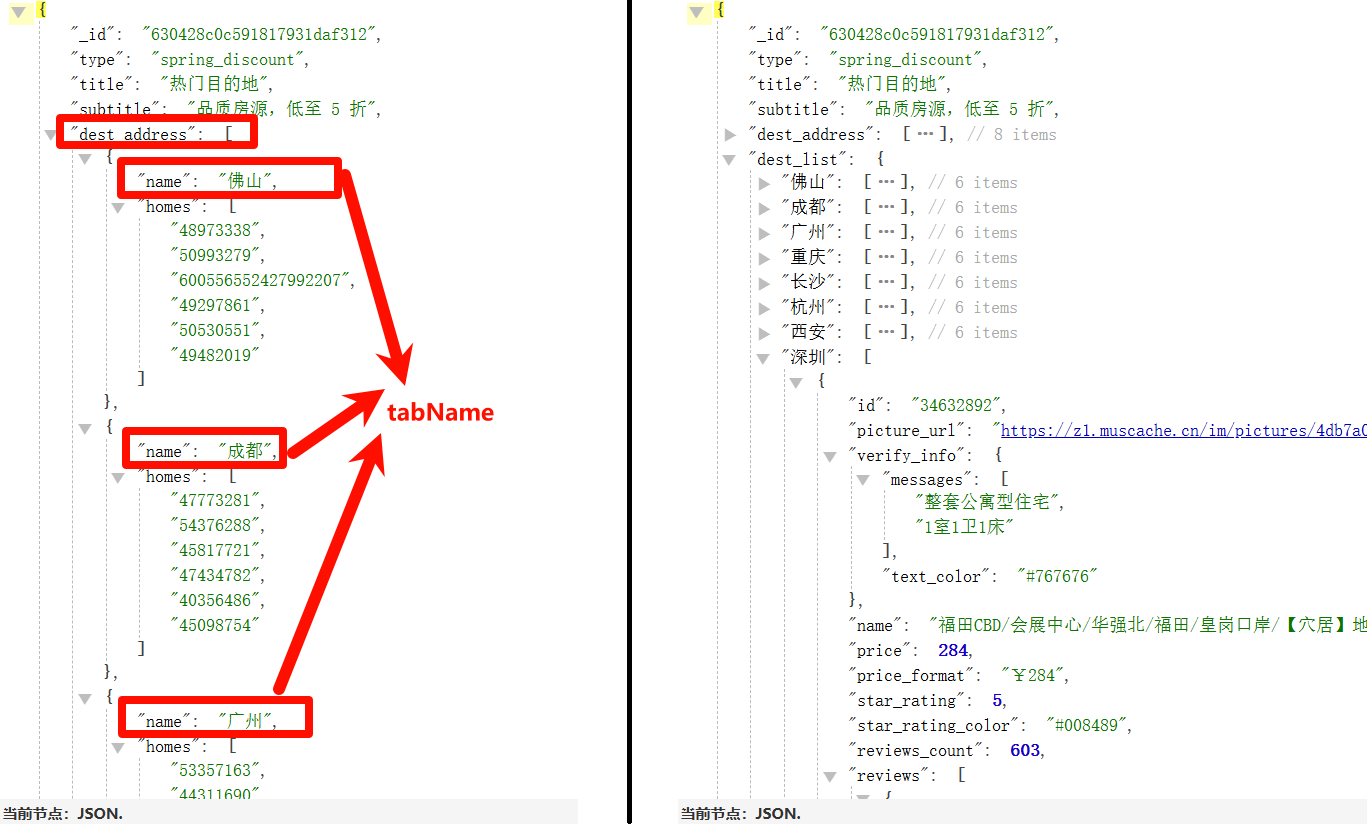
接口返回的数据 dest_list 是一个对象,key 是选项卡选项,value 是数组,数组中每个元素是对象,对象是每个房源信息。
上面的数据在父组件 @\views\home\index.jsx 中,而选项卡当前的选中信息在子组件 @\components\section-tabs\index.jsx 中。子组件的信息需要在父组件使用,那么,父组件需要通过 props 传递一个回调函数 tabClick。
父组件:
const tabClick = (index, tabName) => {
  setTabName(tabName)
}

<div>
  <SectionTabs tabs={tabs} tabClick={tabClick} />
  <SectionHeader title={discountInfo.title} subtitle={discountInfo.subtitle} />
  <SectionRooms roomList={discountInfo.dest_list?.[tabName]} itemWidth='33.333%' />
</div>子组件:
const activeTab = (index, tabName) => {
  setActiveIndex(index)
  tabClick(index, tabName)
}

<TabsWrapper>
  {
    tabs.map((tabName, index) => (
      <div
        key={index}
        className={classNames('item', { active: index === activeIndex })}
        onClick={() => activeTab(index, tabName)}
      >
        {tabName}
      </div>
    ))
  }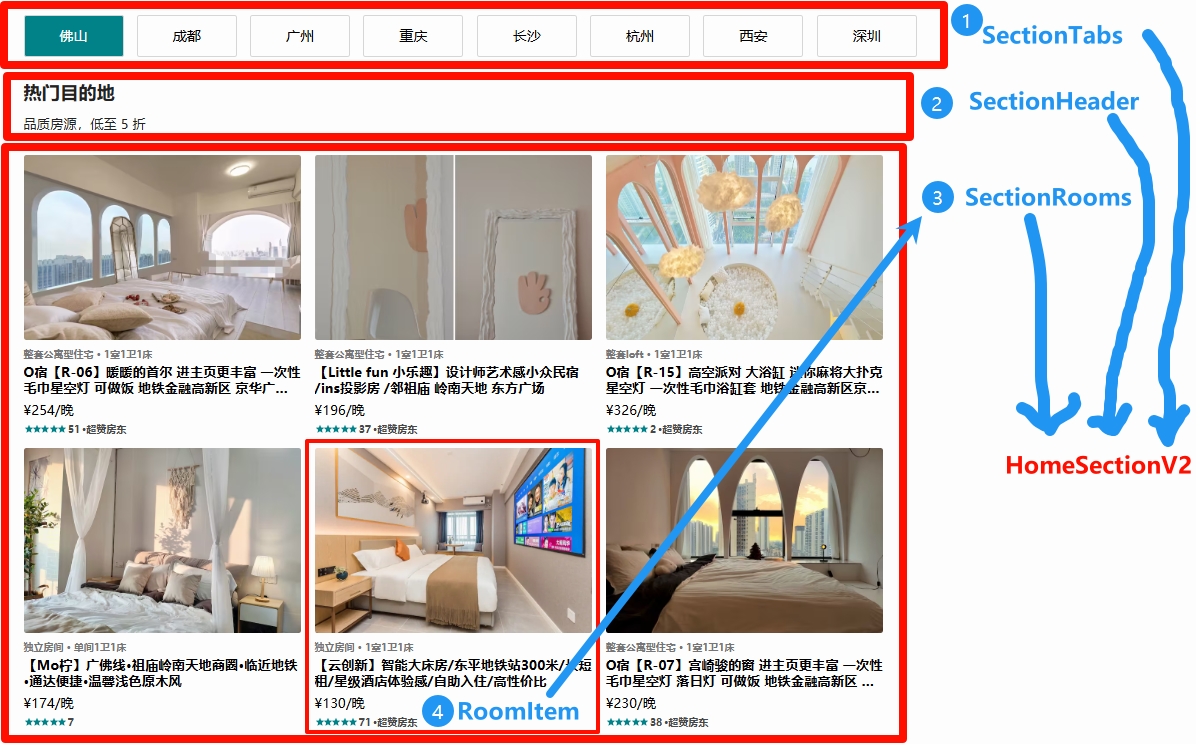
</TabsWrapper>3. 封装折扣优惠组件
@\views\home\c-cpns\home-section-v2\index.jsx
import React, { memo, useState } from 'react'
import PropTypes from 'prop-types'

import { HomeSectionV2Wrapper } from './style'
import SectionHeader from "@/components/section-header"
import SectionRooms from "@/components/section-rooms"
import SectionTabs from "@/components/section-tabs"


const HomeSectionV2 = memo((props) => {
  const { discountInfo } = props
  const [tabName, setTabName] = useState('佛山')

  const tabClick = (index, tabName) => {
    setTabName(tabName)
  }

  const tabs = discountInfo.dest_address?.map(item => item.name)

  return (
    <HomeSectionV2Wrapper>
      <SectionTabs tabs={tabs} tabClick={tabClick} />
      <SectionHeader title={discountInfo.title} subtitle={discountInfo.subtitle} />
      <SectionRooms roomList={discountInfo.dest_list?.[tabName]} itemWidth='33.333%' />
    </HomeSectionV2Wrapper>
  )
})

HomeSectionV2.propTypes = {
  discountInfo: PropTypes.object.isRequired
}

export default HomeSectionV2然后在 @\views\home\index.jsx 中只需导入即可。
import HomeSectionV2 from "./c-cpns/home-section-v2";

<HomeWrapper>
  <HomeBanner></HomeBanner>
  <div className='content'>
    <HomeSectionV2 discountInfo={discountInfo} />
    <HomeSectionV1 initData={goodPriceInfo} />
    <HomeSectionV1 initData={highScoreInfo} />
  </div>
</HomeWrapper>4. 默认选中
@\views\home\c-cpns\home-section-v2\index.jsx
const initialName = Object.keys(discountInfo.dest_list)[0]
const [tabName, setTabName] = useState(initialName)@\utils\is-empty-object.js
export function isEmptyO(obj) {
  return !!Object.keys(obj).length
}@\views\home\index.jsx
<div className='content'>
  { isEmptyO(discountInfo) && <HomeSectionV2 discountInfo={discountInfo}/>}
  { isEmptyO(goodPriceInfo) && <HomeSectionV1 initData={goodPriceInfo}/> }
  { isEmptyO(highScoreInfo) && <HomeSectionV1 initData={highScoreInfo}/> }
</div>还可以在
@\views\home\c-cpns\home-section-v2\index.jsx中监听 initData 数据改变,就调用 setTabName 来改变 tabName,会造成页面重新渲染,所以点击选项卡的每一项的时候也会重新发送网络请求,展示当前选中项的数据。但不推荐,会造成页面渲染多次(没数据的时候、有数据的时候、数据改变的时候)。
第四章:热门推荐
一、获取数据
1. 封装 API
export function getHomeHotrecommenddestData() {
  return request.get({
    url: "/home/hotrecommenddest"
  })
}2. 数据存到 redux
import { getHomeHotrecommenddestData } from "@/services"

export const fetchHomeDataAction = createAsyncThunk("fetchdata", async (payload, {dispatch}) => {
  getHomeHotrecommenddestData().then((res) => {
    dispatch(sethotrecommenddestInfo(res))
  })
})

const homeSlice = createSlice({
  name: "home",
  initialState: {
    hotrecommenddestInfo: [],
  },
  reducers: {
    sethotrecommenddestInfo: (state, action) => {
      state.hotrecommenddestInfo = action.payload
    }
  },
})

export const { sethotrecommenddestInfo } = homeSlice.actions二、数据展示
@\views\home\index.jsx
const { hotrecommenddestInfo } = useSelector(state => ({
  hotrecommenddestInfo: state.home.hotrecommenddestInfo,
}), shallowEqual)

<HomeWrapper>
  <HomeBanner></HomeBanner>
    <div className='content'>
      { isEmptyO(discountInfo) && <HomeSectionV2 discountInfo={discountInfo}/>}
      { isEmptyO(hotrecommenddestInfo) && <HomeSectionV2 discountInfo={hotrecommenddestInfo}/>}
      { isEmptyO(goodPriceInfo) && <HomeSectionV1 initData={goodPriceInfo}/> }
      { isEmptyO(highScoreInfo) && <HomeSectionV1 initData={highScoreInfo}/> }
    </div>
</HomeWrapper>第五章:选项卡滚动
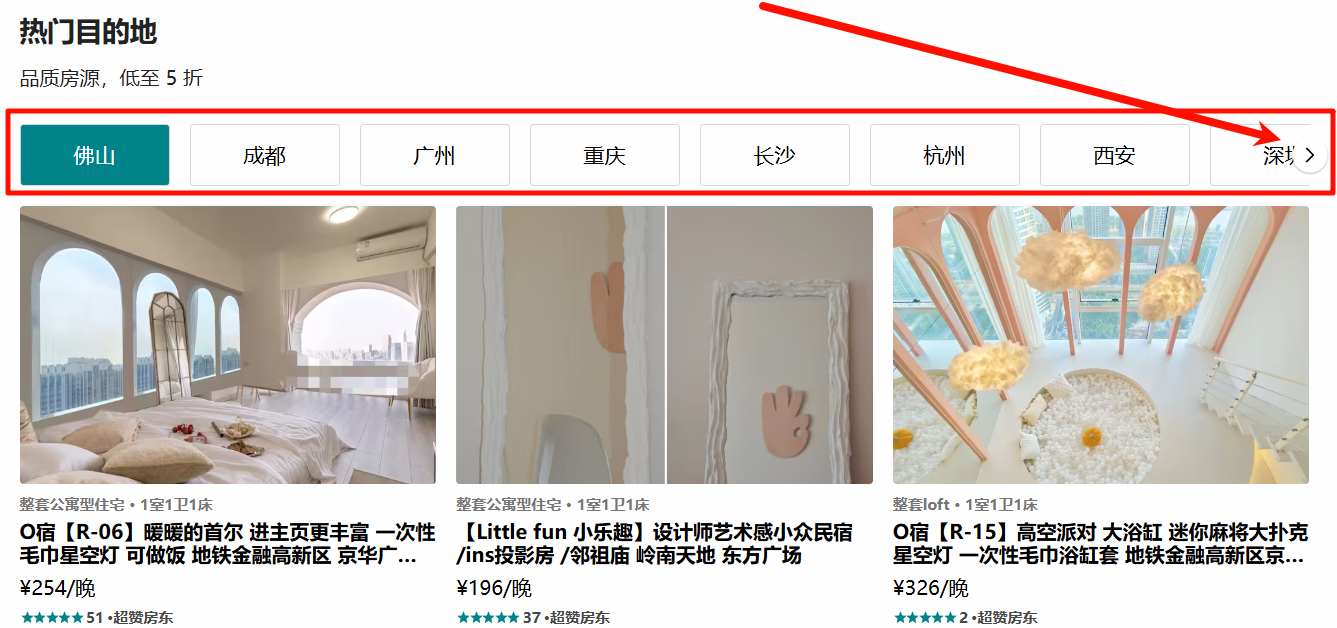
1. 思路分析

滚动功能在 Home 其他地方也用得到,所以应该封装为一个通用组件。选项卡中的每一个 item 都应该通过 props 传递给 ScrollView。
2. 封装组件
@\base-ui\scroll-view\index.jsx
点我查看代码
import React, { memo, useEffect, useState } from 'react'
import { useRef } from 'react'

import { ViewWrapper } from './style'

import IconArrowLeft from '@/assets/svg/icon-arrow-left'
import IconArrowRight from '@/assets/svg/icon-arrow-right'


const ScrollView = memo((props) => {
  /* 定义内部的状态 */
  const [posIndex, setPosIndex] = useState(0)
  const [showLeft, setShowLeft] = useState(false)
  const [showRight, setShowRight] = useState(false)
  const totalDistanceRef = useRef()

  /* 组件渲染完毕, 判断是否显示右侧的按钮 */
  const scrollContentRef = useRef()
  useEffect(() => {
    const scrollWidth = scrollContentRef.current.scrollWidth // 一共可以滚动的宽度
    const clientWidth = scrollContentRef.current.clientWidth // 本身占据的宽度
    const totalDistance = scrollWidth - clientWidth
    totalDistanceRef.current = totalDistance
    setShowRight(totalDistance > 0)
  }, [props.children])

  /* 事件处理的逻辑 */
  function controlClickHandle(isRight) {
    const newIndex = isRight ? posIndex + 1: posIndex - 1
    const newEl = scrollContentRef.current.children[newIndex]
    const newOffsetLeft = newEl.offsetLeft
    scrollContentRef.current.style.transform = `translate(-${newOffsetLeft}px)`
    setPosIndex(newIndex)
    // 是否继续显示右侧的按钮
    setShowRight(totalDistanceRef.current > newOffsetLeft)
    setShowLeft(newOffsetLeft > 0)
  }

  return (
    <ViewWrapper>
      { showLeft && (
        <div className='control left' onClick={e => controlClickHandle(false)}>
          <IconArrowLeft/>
        </div>
      ) }
      { showRight && (
        <div className='control right' onClick={e => controlClickHandle(true)}>
          <IconArrowRight/>
        </div>
      ) }

      <div className='scroll'>
        <div className='scroll-content' ref={scrollContentRef}>
          {props.children}
        </div>
      </div>
    </ViewWrapper>
  )
})

ScrollView.propTypes = {}
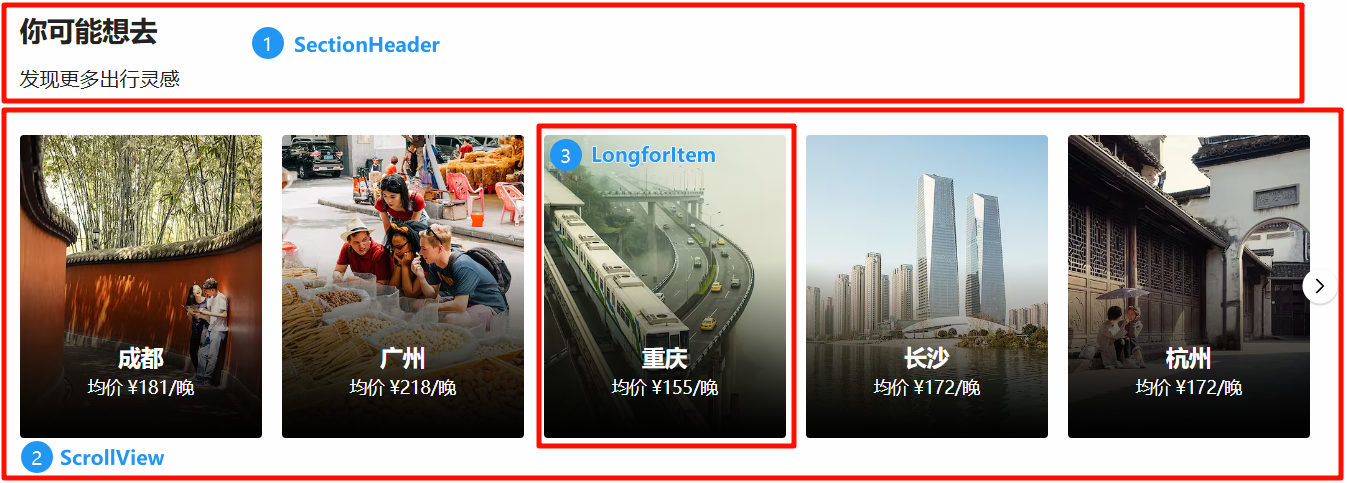
export default ScrollView第六章:向往城市
一、获取数据
1. 封装 API
export function getHomeLongForData() {
  return request.get({
    url: "/home/longfor"
  })
}2. 数据存到 redux
import { getHomeLongForData } from "@/services"

export const fetchHomeDataAction = createAsyncThunk("fetchdata", async (payload, {dispatch}) => {
  getHomeLongForData().then((res) => {
    dispatch(setLongForInfo(res))
  })
})

const homeSlice = createSlice({
  name: "home",
  initialState: {
    longForInfo: [],
  },
  reducers: {
    setLongForInfo: (state, action) => {
      state.longForInfo = action.payload
    },
  },
})

export const { setLongForInfo } = homeSlice.actions二、数据基本展示
封装组件,通过 props 传入组件需要的数据。
新增文件:
@\views\home\c-cpns\home-longfor
@\components\longfor-item
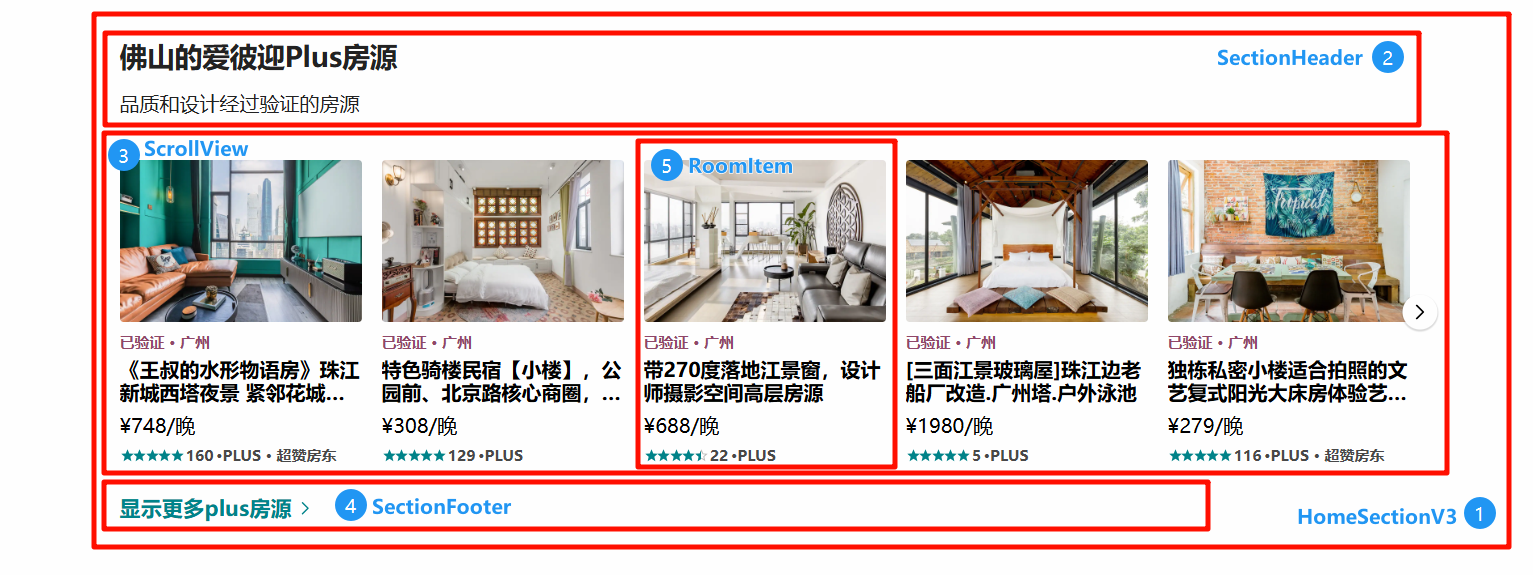
第七章:Plus 房源
一、获取数据
1. 封装 API
export function getHomePlusData() {
  return request.get({
    url: "/home/plus"
  })
}2. 数据存到 redux
import { getHomePlusData } from "@/services"

export const fetchHomeDataAction = createAsyncThunk("fetchdata", async (payload, {dispatch}) => {
  getHomePlusData().then((res) => {
    dispatch(setPlusInfo(res))
  })
})

const homeSlice = createSlice({
  name: "home",
  initialState: {
    plusInfo: [],
  },
  reducers: {
    setPlusInfo: (state, action) => {
      state.plusInfo = action.payload
    },
  },
})

export const { setPlusInfo } = homeSlice.actions二、数据基本展示
封装组件,通过 props 传入组件需要的数据。
新增文件:
@\views\home\c-cpns\home-section-v3
@\components\section-footer