
Entire 页面
第一章:过滤区域

一、编写假数据
@\assets\data\filter_data.json
[
  "人数",
  "可免费取消",
  "房源类型",
  "价格",
  "位置区域",
  "闪定",
  "卧室/床数",
  "促销/优惠",
  "更多筛选条件"
]二、页面展示
@\views\entire\c-cpns\entire-filter\index.jsx
import filterData from "@/assets/data/filter_data.json"

// 点击添加或取消激活样式
const [selectItems, setSelectItems] = useState([])

function itemClickHandle(item) {
  const newItems = [...selectItems]
  if (newItems.includes(item)) { // 移除操作
    const itemIndex = newItems.findIndex(filterItem => filterItem === item)
    newItems.splice(itemIndex, 1)
  } else { // 添加操作
    newItems.push(item)
  }
  setSelectItems(newItems)
}

// 遍历展示数据
{
  filterData.map((item) => {
    return (
      <div
        className={classNames("item", { active: selectItems.includes(item) })}
        key={item}
        onClick={e => itemClickHandle(item)}
      >
        {item}
      </div>
    )
  })
}选中过滤条件高亮思路:
搞一个数组 selectItems,记录选中的条件。给每个条件绑定一个单击事件,触发事件时就判断以前选中过这个条件吗,选中过就移除,否则添加。
使用 classNames 库,给 item 添加 active 样式,条件是在 selectItems 数组中,就添加 active 样式。
第二章:房屋列表
一、数据获取
1. 封装 API 接口
@\services\modules\entire.js
export function getEntireRoomList(offset = 0, size = 20) {
  return request.get({
    url: '/entire/list',
    params:{
      offset,
      size
    }
  })
}2. 存到 redux
1)定义 action.type 常量
@\store\features\entire\constants.js
export const CHANGE_ROOM_LIST = "entire/change_room_list"
export const CHANGE_TOTAL_COUNT = "entire/change_total_count"2)把房屋总记录数与每个房屋信息存到 store 中
@\store\features\entire\reducer.js
import { CHANGE_ROOM_LIST, CHANGE_TOTAL_COUNT } from './constants'

const initialState = {
  roomList: [],
  totalCount: 0,
  currentPage: 0,
}

const reducer = (state = initialState, action) => {
  switch (action.type) {
    case CHANGE_ROOM_LIST:
      return { ...state, roomList: action.roomList }
    case CHANGE_TOTAL_COUNT:
      return { ...state, totalCount: action.totalCount }
    case CHANGE_CURRENT_PAGE:
      return { ...state, currentPage: action.currentPage }
    default:
      return state
  }
}3)定义 action
@\store\features\entire\createActions.js
export const changeRoomListAction = (roomList) => ({
  type: actionTypes.CHANGE_ROOM_LIST,
  roomList
})

export const changeTotalCountAction = (totalCount) => ({
  type: actionTypes.CHANGE_TOTAL_COUNT,
  totalCount
})

export const fetchRoomListAction = () => {
  return async (dispatch, getState) => {
    // 1.根据页码获取最新的数据
    const currentPage = getState().entire.currentPage
    const res = await getEntireRoomList(currentPage * 20)

    // 2.获取到最新的数据, 保存redux的store中
    const roomList = res.list
    const totalCount = res.totalCount
    dispatch(changeRoomListAction(roomList))
    dispatch(changeTotalCountAction(totalCount))
  }
}3. 页面发起请求
在 entire 组件中,只要组件一挂载就发起异步 action,获取房间列表数据存到 redux 中。
@\views\entire\index.jsx
const dispatch = useDispatch()
useEffect(() => {
dispatch(fetchRoomListAction())
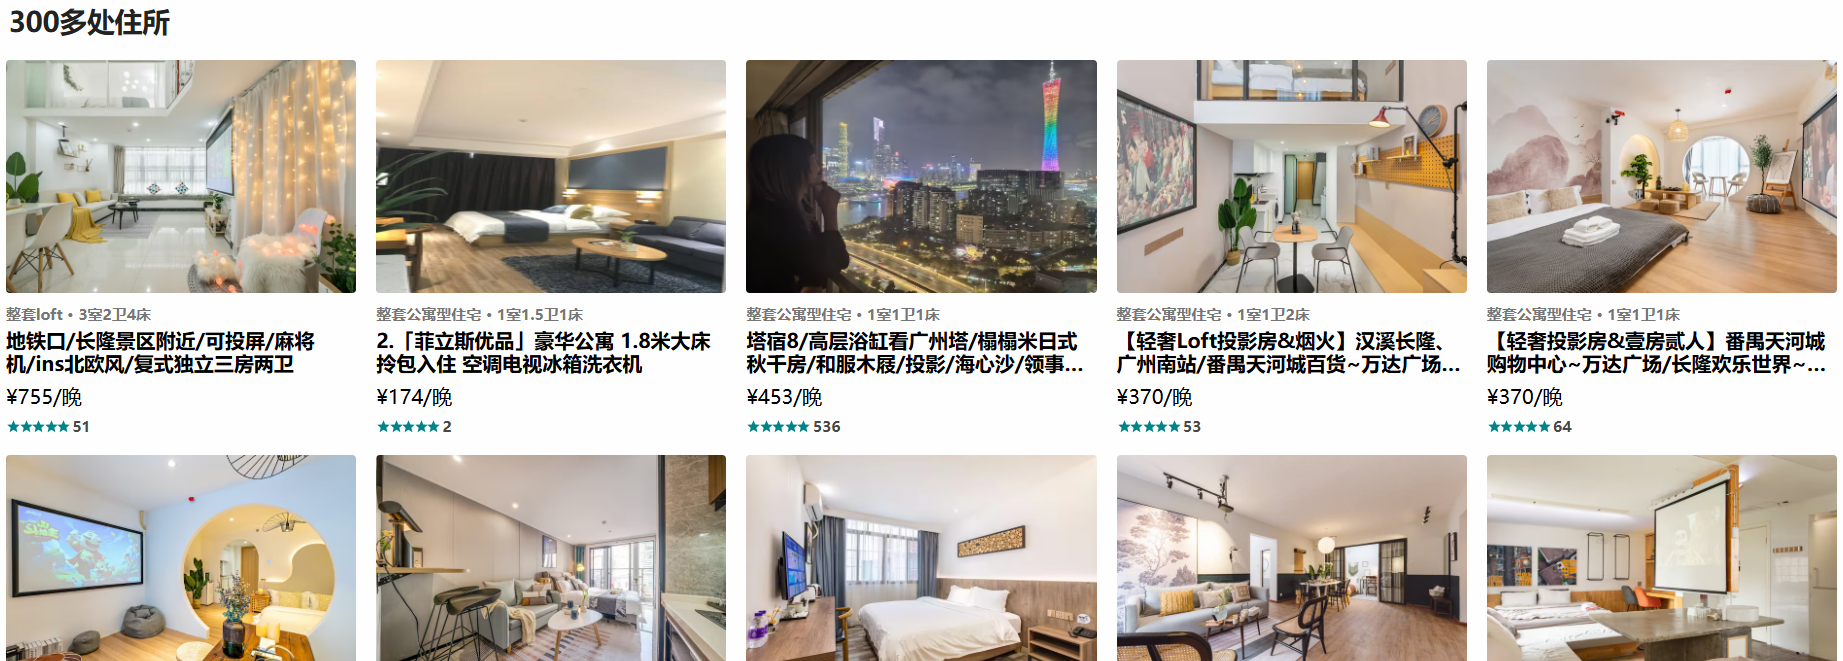
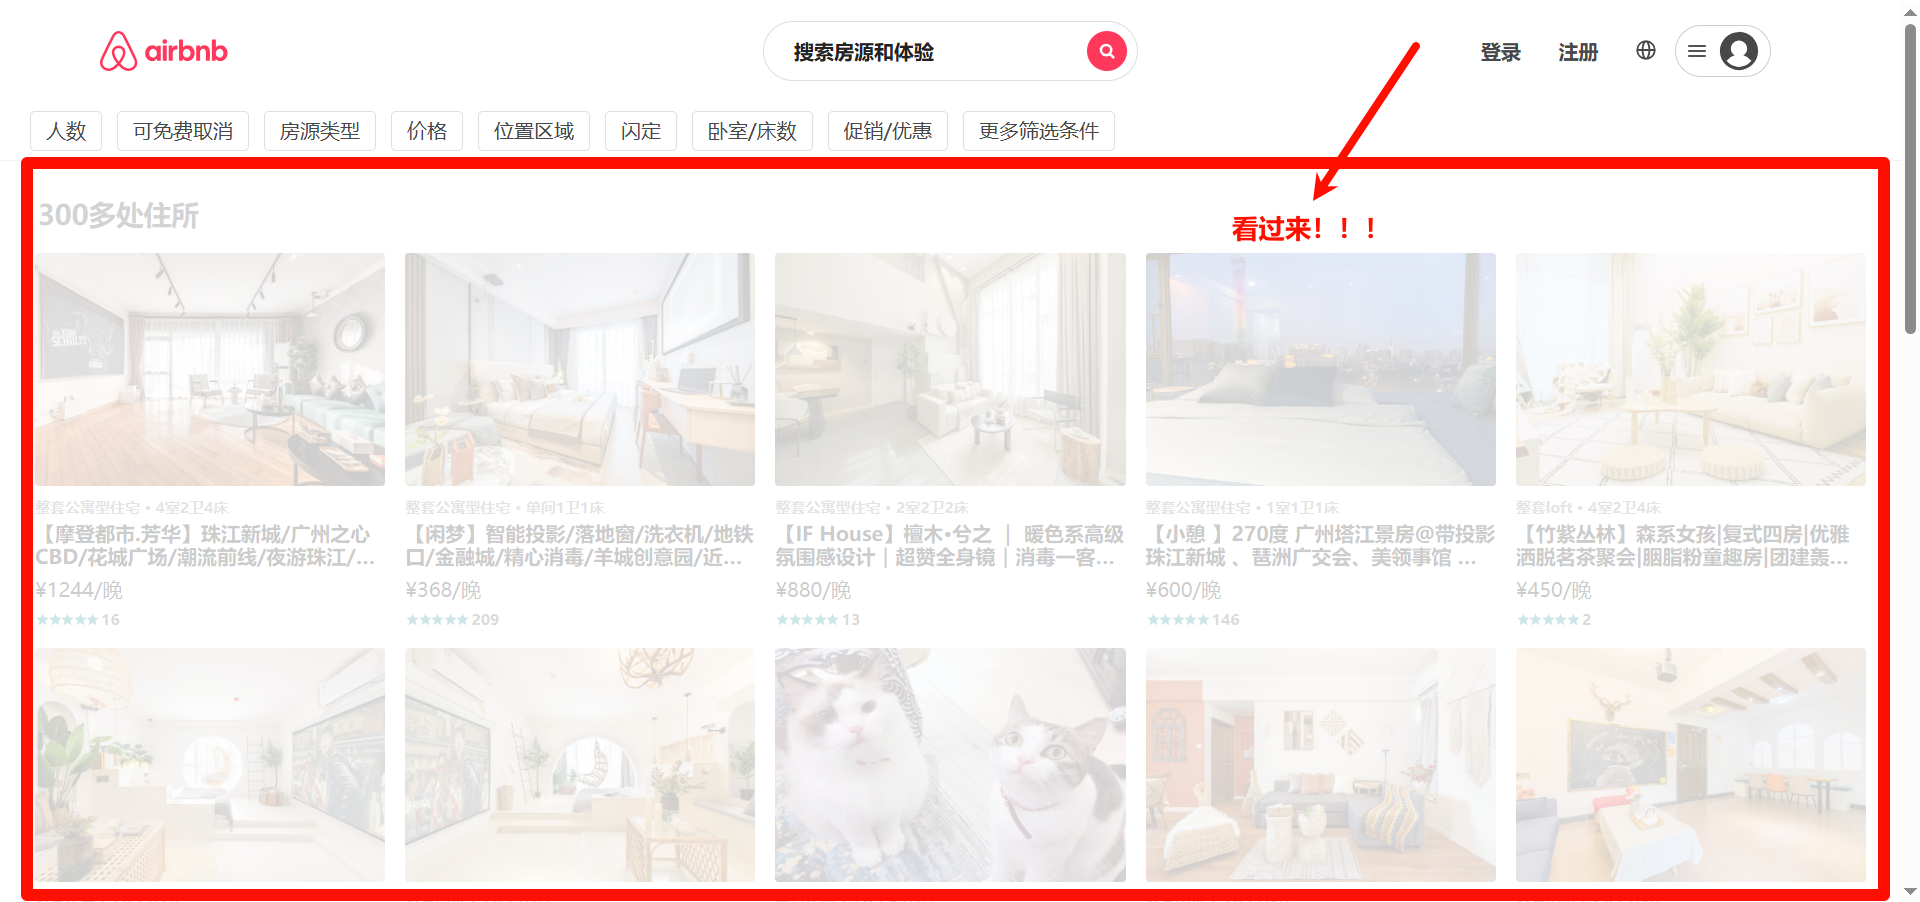
}, [dispatch])二、数据展示
@\views\entire\c-cpns\entire-rooms\index.jsx 中从 redux 中拿到房间列表数据。
/* 从redux中获取roomList数据 */
const { roomList, totalCount } = useSelector((state) => ({
  roomList: state.entire.roomList,
  totalCount: state.entire.totalCount,
}), shallowEqual)

/* 遍历roomList展示数据 */
<RoomsWrapper>
  <h2 className='title'>{totalCount}多处住所</h2>
  <div className='list'>
    {
      roomList.map((item) => {
        return (
          <RoomItem
            itemData={item}
            itemWidth="20%"
            key={item._id}
          />
        )
      })
    }
  </div>
</RoomsWrapper>第三章:页码

一、Pagination 组件
使用 React Pagination component - Material UI 现成的组件。
// 1.导入组件
import Pagination from '@mui/material/Pagination'

// 2.使用组件
<Pagination count={10} />二、页面填数据
const { totalCount, currentPage, roomList } = useSelector((state) => ({
  totalCount: state.entire.totalCount,
  currentPage: state.entire.currentPage, // currentPage 从 0 开始
}), shallowEqual)

//【必须掌握】页码、开始数据与结束数据在整个数据中的位置
const totalPage = Math.ceil(totalCount / 20)
const startCount = currentPage * 20 + 1
const endCount = (currentPage + 1) * 20

<PaginationWrapper>
  <div className='info'>
    <Pagination count={totalPage} />
    <div className='desc'>
      第 {startCount} - {endCount} 个房源, 共超过 {totalCount} 个
    </div>
  </div>
</PaginationWrapper>三、页码变,数据变
查阅 Material UI 文档,Pagination 有一个属性 onChange。只要页码改变,就会回调这个函数。且传入 pageCount 这个参数,pageCount 是当前页,由 Material UI 维护,从 1 开始。
<Pagination count={totalPage} onChange={pageChangeHandle} />

const dispatch = useDispatch()
function pageChangeHandle(event, pageCount) {
  // 回到顶部
  window.scrollTo(0, 0)
  // 更新最新的页码: redux => currentPage
  dispatch(changeCurrentPageAction(pageCount - 1))
  // 重新发送网络请求
  dispatch(fetchRoomListAction())
}上面代码有两个 dispatch,优化下。把【更新最新的页码】移动到【重新发送网络请求】里。
// dispatch(changeCurrentPageAction(pageCount - 1))
dispatch(fetchRoomListAction(pageCount - 1))export const fetchRoomListAction = (page = 0) => {
return async (dispatch, getState) => {
// 0.修改currentPage
dispatch(changeCurrentPageAction(page))
// 1.根据页码获取最新的数据
const currentPage = getState().entire.currentPage
const res = await getEntireRoomList(page * 20)
// 2.获取到最新的数据, 保存redux的store中
const roomList = res.list
const totalCount = res.totalCount
dispatch(changeRoomListAction(roomList))
dispatch(changeTotalCountAction(totalCount))
}
}第四章:加载蒙版
1)添加遮罩层
@\views\entire\c-cpns\entire-rooms\index.jsx
<div className='cover'></div>2)使用变量控制显示与隐藏
@\views\entire\c-cpns\entire-rooms\index.jsx
/* 从redux中获取roomList数据 */
const { roomList, totalCount, isLoading } = useSelector((state) => ({
  roomList: state.entire.roomList,
  totalCount: state.entire.totalCount,
  isLoading: state.entire.isLoading
}), shallowEqual)

{ isLoading && <div className='cover'></div> }3)在发起网络请求之前 isLoading 设置为 true,完成后设置为 false。那么,页面数据什么时候改变?在触发分页组件回调函数中,进一步来说是在发起网络请求 @\store\features\entire\createActions.js 的 fetchRoomListAction 中。
export const fetchRoomListAction = (page = 0) => {
  return async (dispatch) => {
    // 0.修改currentPage
    dispatch(changeCurrentPageAction(page))

    // 1.根据页码获取最新的数据
    dispatch(changeIsLoadingAction(true))
    const res = await getEntireRoomList(page * 20)
    dispatch(changeIsLoadingAction(false))

    // 2.获取到最新的数据, 保存redux的store中
    const roomList = res.list
    const totalCount = res.totalCount
    dispatch(changeRoomListAction(roomList))
    dispatch(changeTotalCountAction(totalCount))
  }
}第五章:轮播图
一、轮播图组件
使用 Ant Design 提供的现成组件 走马灯 (Carousel)。
{/* dots 取消默认指示器 */}
<Carousel dots={false}>
  {
    itemData.picture_urls.map((item, index) => {
      return (
        <div key={index} className='cover'>
          <img src={item} alt="" />
        </div>
      )
    })
  }
</Carousel>二、箭头实现点击切换
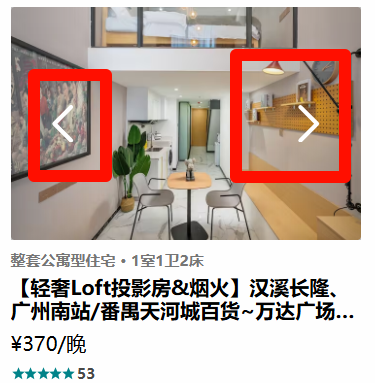
@\components\room-item\index.jsx
const [selectIndex, setSelectIndex] = useState(0)
const sliderRef = useRef()

function controlClickHandle(isRight = true) {
  // 上一个面板/下一个面板
  isRight ? sliderRef.current.next(): sliderRef.current.prev()

  // 最新的索引 (指示器用得到)
  let newIndex = isRight ? selectIndex + 1: selectIndex - 1
  const length = itemData.picture_urls.length
  if (newIndex < 0) newIndex = length - 1
  if (newIndex > length - 1) newIndex = 0
  setSelectIndex(newIndex)
}

<div className="slider">
  <div className='control'>
    <div className='btn left' onClick={e => controlClickHandle(false)}>
      <IconArrowLeft width="30" height="30"/>
    </div>
    <div className='btn right' onClick={e => controlClickHandle(true)}>
      <IconArrowRight width="30" height="30"/>
    </div>
  </div>
  <Carousel dots={false} ref={sliderRef}>
    {
      itemData?.picture_urls?.map((item, index) => {
        return (
          <div key={index} className='cover'>
            <img src={item} alt="" />
          </div>
        )
      })
    }
  </Carousel>
</div>三、指示器
大体思路:
这个小圆点多少是根据图片数量来确定的。小圆点容器设置宽度,当小圆点多的时候,超出部分隐藏。这个 Indicator 组件只关心当前展示图片的索引是多少,来给小圆点设置激活样式。
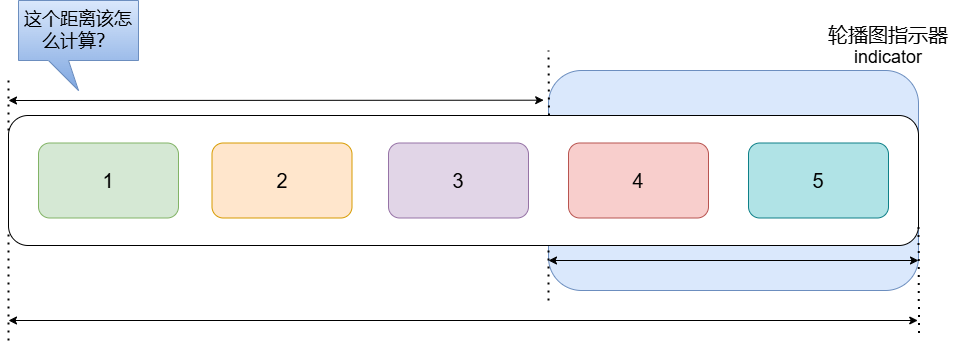
如何控制激活小圆点居中呢?
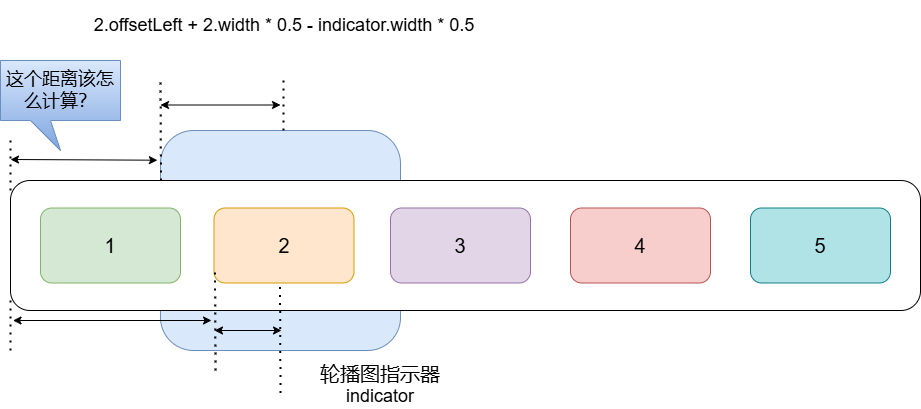
特殊情况处理
1. 封装组件
点我查看代码
import React, { memo, useEffect, useRef } from 'react'
import PropTypes from 'prop-types'

import { IndicatorWrapper } from './style'

const Indicator = memo((props) => {
  const { selectIndex = 0 } = props
  const contentRef = useRef()

  useEffect(() => {
    // 1.获取selectIndex对应的item
    const selectItemEl = contentRef.current.children[selectIndex]
    const itemLeft = selectItemEl.offsetLeft
    const itemWidth = selectItemEl.clientWidth
    // 2.content的宽度
    const contentWidth = contentRef.current.clientWidth
    const contentScroll = contentRef.current.scrollWidth
    // 3.获取selectIndex要滚动的距离
    let distance = itemLeft + itemWidth * 0.5 - contentWidth * 0.5
    // 4.特殊情况的处理
    if (distance < 0) distance = 0 // 左边的特殊情况处理
    const totalDistance = contentScroll - contentWidth
    if (distance > totalDistance) distance = totalDistance // 右边的特殊情况处理

    // 5.改变位置即可
    contentRef.current.style.transform = `translate(${-distance}px)`
  }, [selectIndex])

  return (
    <IndicatorWrapper>
      <div className='i-content' ref={contentRef}>
        {
          props.children
        }
      </div>
    </IndicatorWrapper>
  )
})

Indicator.propTypes = {
  selectIndex: PropTypes.number
}

export default Indicator2. 使用组件
import Indicator from '@/base-ui/indicator';

<div className='slider'>
  <div className='control'>
    {/* ...... */}
  </div>
  <div className='indicator'>
    <Indicator selectIndex={selectIndex}>
      {
        itemData?.picture_urls?.map((item, index) => {
          return (
            <div className="item" key={item}>
              <span className={classNames("dot", { active: selectIndex === index })}></span>
            </div>
          )
        })
      }
    </Indicator>
  </div>
  <div className='desc'>
    {/* ...... */}
  </div>
</div>四、判断是否轮播
目前 RoomItem 组件功能比较复杂了。在首页 RoomItem 不需要轮播,而 entire 页面需要轮播。如何根据不同的场景判断是否使用轮播?
const pictureElement = ( {/* 不轮播的 jsx */} )
const sliderElement = ( {/* 轮播的 jsx */} )

import Indicator from '@/base-ui/indicator';

<div className='slider'>
  <div className='control'>
    {/* ...... */}
  </div>
  <div className='indicator'> // [!code --]
    <Indicator selectIndex={selectIndex}> // [!code --]
      {
        itemData?.picture_urls?.map((item, index) => {
          return (
            <div className="item" key={item}> // [!code --]
              <span className={classNames("dot", { active: selectIndex === index })}></span> // [!code --]
            </div>
          )
        })
      } // [!code --]
    </Indicator> // [!code --]
  </div> // [!code --]
  { !itemData.picture_urls ? pictureElement : sliderElement } // [!code ++]
  <div className='desc'>
    {/* ...... */}
  </div>
</div>